Reinforcing the Glass Strut Fabricating NG-30 Installing Worm Drive Assembly Box Assembly
Nose Floor & Sides Rudder Pedals Master Brake Cylinders Completing Nose Gear
Pitot & Static System Closing the Top Nose Door
The
plan said that this section should take an hour or two... yeah right! I don't
know about you fast builders out there, it took me an hour or two just to
complete the first 4 words of this section - "Cut out bulkhead F-0".
The plan didn't mention that you need to first trace out the pattern from the
drawings, transfer it to the foam, cut the foam out and round off the edges ![]() !
Now, here's the rest of the work in this section...
!
Now, here's the rest of the work in this section...
| Mounting NG-30 onto the Fuselage |
|
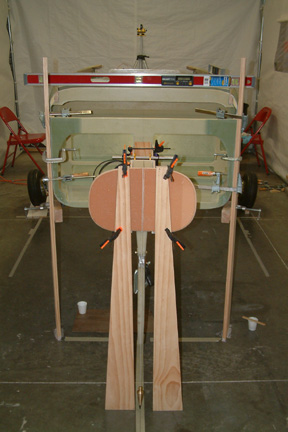
Once the bondo cured, I trial fit the NG-30 in place. I dropped another plumb line down the center of F-0 onto the center line on the floor. Again, I used another set of 'feet' from Chapter 5 to hold up the front part of NG-30. |
|
- 4 clamps in the front - holding F-0 up and level; - 3 clamps on each side of the fuselage holding the 'crutches' and keeping the fuselage level; - 2 clamps on the bottom, pulling the lower NG-30 against F-22; - a bungee cord pulling the upper NG-30 against F-22; - 2 more C-clamps holding a 3" spacer between NG-30.
I
counted 18 clamps of varying sizes and a bungee cord. I think I should be in the
C-clamp business |
|
The 3" wood spacer serves 2 purposes - 1) it keeps the spacing between the NG-30 sides to the plan dimension; 2) I drew a center line on the spacer and lined it up against the center of F-22. Therefore, between this spacer center line and the plumb line at F-0, my NG-30 should be in-line with the entire fuselage from F-0 to the firewall.
I re-checked the leveling of the fuselage side to side and fore to aft. Then I disassembled all the clamps and floxed the back edges of NG-30. I scraped off the excess flox and re-clamped the NG-30 back as before. Due to all the clamps and spacers, I waited for the flox to cure first, then I applied BID tapes and peel plied the next day. |
 Before
mounting the NG-30 to the fuselage, I need to level the fuselage side to side and
front to back. Instead of using the sawhorses for the front and back, I left the
main gears on, but raised the front of fuselage by clamping a couple fixture
boards (from Chapter 5) on both
sides of the fuselage like crutches. By adjusting the clamping location, I was
able to level the fuselage side to side and front to back. Then I dropped two
plumb lines to the floor, one from the center of the firewall, and the other
from the F-22. Using a laser line, I connected the two plumb lines and projected it
forward for NG-30 alignment. Once I was satisfied with the alignment, I bondoed
the feet to the floor - nobody moves!
Before
mounting the NG-30 to the fuselage, I need to level the fuselage side to side and
front to back. Instead of using the sawhorses for the front and back, I left the
main gears on, but raised the front of fuselage by clamping a couple fixture
boards (from Chapter 5) on both
sides of the fuselage like crutches. By adjusting the clamping location, I was
able to level the fuselage side to side and front to back. Then I dropped two
plumb lines to the floor, one from the center of the firewall, and the other
from the F-22. Using a laser line, I connected the two plumb lines and projected it
forward for NG-30 alignment. Once I was satisfied with the alignment, I bondoed
the feet to the floor - nobody moves!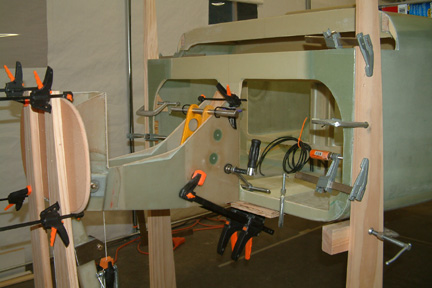 Here's
all the clamping I used to keep NG-30 in place for floxing. They include:
Here's
all the clamping I used to keep NG-30 in place for floxing. They include: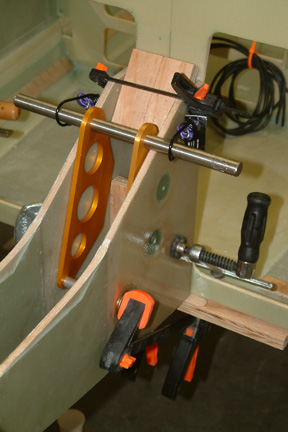 Here
is a close up look of my mounting approach. I clamped a board onto the bottom of
the fuselage such that it provided a step for the NG-30 to 'rest' on. Don't forget
to put packing tape on it so the flox won't ooze down on it. The board
also provided an edge for my bottom C-clamp to grab onto, pulling the lower
NG-30
against F-22. Note the steel rod I have through the nose lift mounting
brackets... it is because I have not installed the EZ NoseLift yet and it
provides a means to pull the upper NG-30 against F-22. The bungee cord basically
wraps around F-22.
Here
is a close up look of my mounting approach. I clamped a board onto the bottom of
the fuselage such that it provided a step for the NG-30 to 'rest' on. Don't forget
to put packing tape on it so the flox won't ooze down on it. The board
also provided an edge for my bottom C-clamp to grab onto, pulling the lower
NG-30
against F-22. Note the steel rod I have through the nose lift mounting
brackets... it is because I have not installed the EZ NoseLift yet and it
provides a means to pull the upper NG-30 against F-22. The bungee cord basically
wraps around F-22.