Locating and Marking the Windows
 I
spent quite a bit of time trying to figure out how to draw the window outlines
on the TB, especially since I have raised the front of my TB by 1". Somehow I
do
not seem to have enough information from Fig. 18 to draw out the windows. So I
visited the Cozy FAQ and found very useful instructions (Q18.8). Based on
that, I was able to draw out the window outlines in 10 minutes. However, the
instructions are for a standard TB and mine is raised 1" at the front.
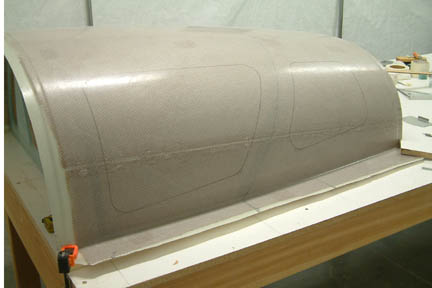
Therefore, I have to improvise a bit. Cosmetically, I feel the inner lines of the windows
should run parallel with the cut line, otherwise it will look funny. So, I
replaced the FAQ instruction's inner lines with 2 parallel lines 2 1/8" from
the
front and aft of the cut
line. The rest remains the same. Initially, I used strips of masking tape on the
TB for trail marking the outlines. Once I was done with the graffiti
I
spent quite a bit of time trying to figure out how to draw the window outlines
on the TB, especially since I have raised the front of my TB by 1". Somehow I
do
not seem to have enough information from Fig. 18 to draw out the windows. So I
visited the Cozy FAQ and found very useful instructions (Q18.8). Based on
that, I was able to draw out the window outlines in 10 minutes. However, the
instructions are for a standard TB and mine is raised 1" at the front.
Therefore, I have to improvise a bit. Cosmetically, I feel the inner lines of the windows
should run parallel with the cut line, otherwise it will look funny. So, I
replaced the FAQ instruction's inner lines with 2 parallel lines 2 1/8" from
the
front and aft of the cut
line. The rest remains the same. Initially, I used strips of masking tape on the
TB for trail marking the outlines. Once I was done with the graffiti![]() ,
I removed the masking tape and drew the outline directly onto the surface of the
TB.
,
I removed the masking tape and drew the outline directly onto the surface of the
TB.
I placed the window panes (from Todd's Canopy) over the marked windows to make sure they are not too small and at the same time fit the TB curvature. I have 3/4" excess on most edges except at a couple opposing corners where I have about 1/2" excess. I think I have maximized the use of the window panes with the layout. I placed strips of 3M vinyl electrical tape on the window pane, along the inside edges of the frame. Then I re-traced the opening on the tape. These marked frame 'outlines' will be used for trimming the window panes as well as re-positioning in the future.
I drew a border (~3/4" wide) along the previously marked 'outline' and trimmed the window pane accordingly. I found the grinder/cutting wheel worked best. Then I cleaned off the edges with my palm sander.
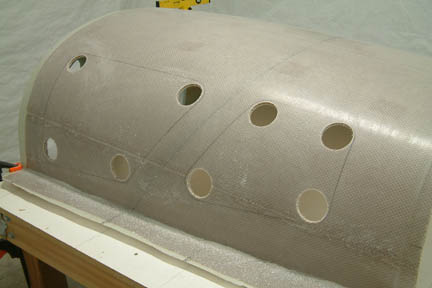 Once
I was comfortable with the outlines, I proceeded with the cutting step. First I used
my largest hole saw (2 1/2") and removed 8 large holes - one at
each of the corners. I must admit I was a bit apprehensive with the first hole
Once
I was comfortable with the outlines, I proceeded with the cutting step. First I used
my largest hole saw (2 1/2") and removed 8 large holes - one at
each of the corners. I must admit I was a bit apprehensive with the first hole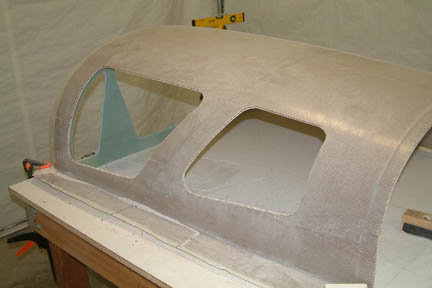 Next,
I used my FEIN tool to trim tightly along the 4 sides - joining the holes.
With a bit of trimming, I was able to remove most of the panel. Then comes
the Dremel with a coarse sanding drum, I cleaned off the rounded corners as well
as the rest of the window edges. Since I am not as skilled as some Cozy builders with the Dremel tool, I smoothed out the straight edges by running my
palm sander over it. My finishing touch included a wood dowel and fine grit sand
paper for an all around smooth edge.
Next,
I used my FEIN tool to trim tightly along the 4 sides - joining the holes.
With a bit of trimming, I was able to remove most of the panel. Then comes
the Dremel with a coarse sanding drum, I cleaned off the rounded corners as well
as the rest of the window edges. Since I am not as skilled as some Cozy builders with the Dremel tool, I smoothed out the straight edges by running my
palm sander over it. My finishing touch included a wood dowel and fine grit sand
paper for an all around smooth edge. 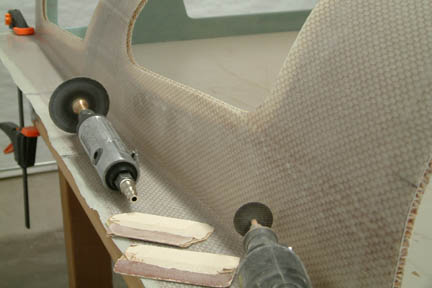 The
plan called for removing ~3/4" of foam along the entire window frame. It
was a bit more difficult for those who bought the TB from Featherlite because
the honeycomb is much harder to remove. I ended up using 2 different types of
sanding/grinding discs to get to the appropriate 3/4" trench depth (I was
not able to find a sanding drum with small enough diameter to fit inside the
trench without taking the glass out in the process). I had to be real careful not
to nick the surface glass with the sanding disc going 2,200 rpm. I also took a
small piece of scrap fiberglass and wrapped 2 different grit sanding papers - to
help smooth out the inner surfaces of the trenches. I think it is most important
to remove all remnants of the honeycomb 'webs' (especially the ones close to the
edges) such that the window panes can be flush with the frame. This turned out
to be a very time consuming process - and patience is definitely required. I was
able to complete the task in ~4 hours with a couple of small nicks. I removed
the nicks by sanding down the edges a bit.
The
plan called for removing ~3/4" of foam along the entire window frame. It
was a bit more difficult for those who bought the TB from Featherlite because
the honeycomb is much harder to remove. I ended up using 2 different types of
sanding/grinding discs to get to the appropriate 3/4" trench depth (I was
not able to find a sanding drum with small enough diameter to fit inside the
trench without taking the glass out in the process). I had to be real careful not
to nick the surface glass with the sanding disc going 2,200 rpm. I also took a
small piece of scrap fiberglass and wrapped 2 different grit sanding papers - to
help smooth out the inner surfaces of the trenches. I think it is most important
to remove all remnants of the honeycomb 'webs' (especially the ones close to the
edges) such that the window panes can be flush with the frame. This turned out
to be a very time consuming process - and patience is definitely required. I was
able to complete the task in ~4 hours with a couple of small nicks. I removed
the nicks by sanding down the edges a bit. 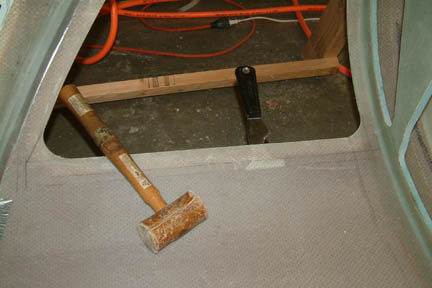 It
took me a while to figure out what the plan means on this step. Basically this
step is for making an opening for slipping the panes into the trenches. I flipped
the TB on its back and drew out the 1" strips along the long edge of each
of the windows. Again, I ran into difficulty in removing the glass (after its
been cut) from the honeycomb materials. By the time I almost completed the 2nd
window, I realized using a scraper and hammer was a lot more effective in
separating the glass from the honeycomb. For the last 2 windows, I used the
scraper and hammer first, then trim/cut the glass strips. That was much easier
and quicker.
It
took me a while to figure out what the plan means on this step. Basically this
step is for making an opening for slipping the panes into the trenches. I flipped
the TB on its back and drew out the 1" strips along the long edge of each
of the windows. Again, I ran into difficulty in removing the glass (after its
been cut) from the honeycomb materials. By the time I almost completed the 2nd
window, I realized using a scraper and hammer was a lot more effective in
separating the glass from the honeycomb. For the last 2 windows, I used the
scraper and hammer first, then trim/cut the glass strips. That was much easier
and quicker. I
taped a straight edge on the panes (~1/8" from the edge of the frame) and
roughed up the plastic surfaces with a Scotch scrub pad. If you look close on the
picture (left), you can see the roughed up border and a clear 1/8" strip -
along the vinyl tapes. I just wanted to
make sure the rough edges do not show up above the window frame.
I
taped a straight edge on the panes (~1/8" from the edge of the frame) and
roughed up the plastic surfaces with a Scotch scrub pad. If you look close on the
picture (left), you can see the roughed up border and a clear 1/8" strip -
along the vinyl tapes. I just wanted to
make sure the rough edges do not show up above the window frame.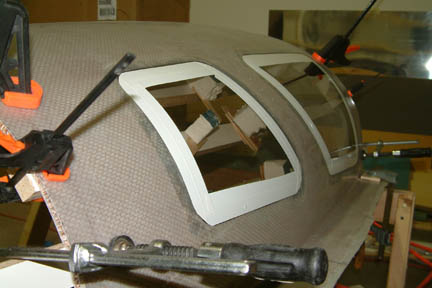 I
made up some wet flox and 'spooned' it along the trenches of the window frame.
Then
I used a narrow stir stick and pressed them further into the trenches
(~1/2"). Next I spread the rest of the wet flox along the perimeters of the
window panes (both sides). Once completed, I slipped the panes in place, using the
white tape (above) to line them up appropriately.
I
made up some wet flox and 'spooned' it along the trenches of the window frame.
Then
I used a narrow stir stick and pressed them further into the trenches
(~1/2"). Next I spread the rest of the wet flox along the perimeters of the
window panes (both sides). Once completed, I slipped the panes in place, using the
white tape (above) to line them up appropriately. Once
the flox that held the panes in place cured, I flipped the TB back on its back and
proceeded to re-glass the 1" strip over the wide opening. In my case, I have a
step between the top of the honeycomb layers and the top of the pane surface. I
didn't like to have a step there (as shown in plan Fig. 20), so, I decided to cut a real thin strip
(~.1") of foam to level out the two surfaces so that the glass strip will lay
down nice and flat. Note the thin foam strip (light yellow) and the 1"
glass strip I removed earlier?
Once
the flox that held the panes in place cured, I flipped the TB back on its back and
proceeded to re-glass the 1" strip over the wide opening. In my case, I have a
step between the top of the honeycomb layers and the top of the pane surface. I
didn't like to have a step there (as shown in plan Fig. 20), so, I decided to cut a real thin strip
(~.1") of foam to level out the two surfaces so that the glass strip will lay
down nice and flat. Note the thin foam strip (light yellow) and the 1"
glass strip I removed earlier?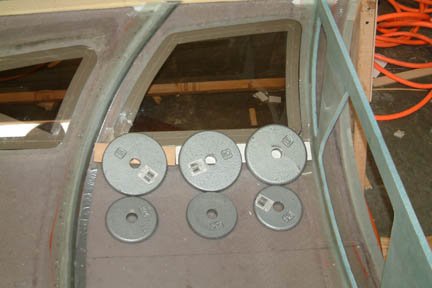 I
made some wet flox and spread it (like peanut butter) on both sides of the foam
as well as the bottom side of the 1" glass strip. I fit everything back
in place, then I added a 2" BID along its seams. With a strip of plastic
between the BID and scrap boards, I weighted them down to cure.
I
made some wet flox and spread it (like peanut butter) on both sides of the foam
as well as the bottom side of the 1" glass strip. I fit everything back
in place, then I added a 2" BID along its seams. With a strip of plastic
between the BID and scrap boards, I weighted them down to cure.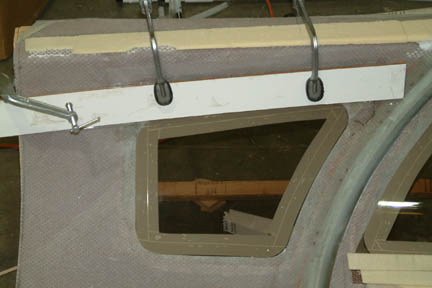 I
did not have to use any thin foam strip on the small windows
for the 1" glass strip to fit nicely (don't know why?) . However, I clamped them down to cure
as well.
I
did not have to use any thin foam strip on the small windows
for the 1" glass strip to fit nicely (don't know why?) . However, I clamped them down to cure
as well.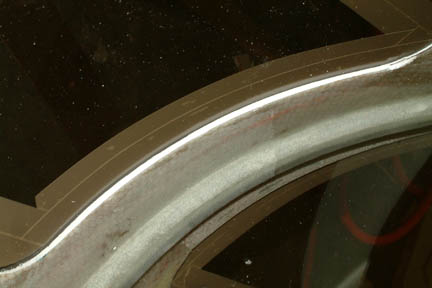 As
I pressed the window panes against the outer TB glass surfaces in the above steps
(fitting in the windows), I noticed that I will have a gap between the inside
surface of the panes and the window frame. I checked the archives and looked up
many builders web sites and found no discussion on this issue. Regardless, I
decided to fill in the gap with micro - I hope I won't regret it because I have
not read the plans very far ahead at this point. Here's a picture of the gap
after I filled it with micro.
As
I pressed the window panes against the outer TB glass surfaces in the above steps
(fitting in the windows), I noticed that I will have a gap between the inside
surface of the panes and the window frame. I checked the archives and looked up
many builders web sites and found no discussion on this issue. Regardless, I
decided to fill in the gap with micro - I hope I won't regret it because I have
not read the plans very far ahead at this point. Here's a picture of the gap
after I filled it with micro.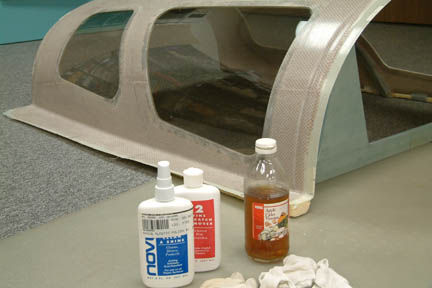 With
a leap of faith, I wet out a cotton glove with vinegar and rubbed it over a small ambiguous
flox smear. To my surprise, the flox starts to flake off after ~10 passes
With
a leap of faith, I wet out a cotton glove with vinegar and rubbed it over a small ambiguous
flox smear. To my surprise, the flox starts to flake off after ~10 passes