 The
kit came with installation instructions, the 3 pairs of parts (left) and 4' of
vent hose. The eye ball vent is made by Whisperflo. Edges of the molded parts
(white) are nice and smooth to minimize air turbulence
when entering the air vent. The eyeball vent openings, however, are not tightly
sealed. I can see gaps between the vent doors and the inside walls - air leaks,
no doubt. After looking through the instruction manual, it actually has a
section showing how to seal the air gaps with silicon rubber!
The
kit came with installation instructions, the 3 pairs of parts (left) and 4' of
vent hose. The eye ball vent is made by Whisperflo. Edges of the molded parts
(white) are nice and smooth to minimize air turbulence
when entering the air vent. The eyeball vent openings, however, are not tightly
sealed. I can see gaps between the vent doors and the inside walls - air leaks,
no doubt. After looking through the instruction manual, it actually has a
section showing how to seal the air gaps with silicon rubber!
The only problem is that the air scoop looks larger than the plans scoop and is thinner. I gather if someone took time to make a molded assembly for the vent, they would have worked out all the bugs prior.
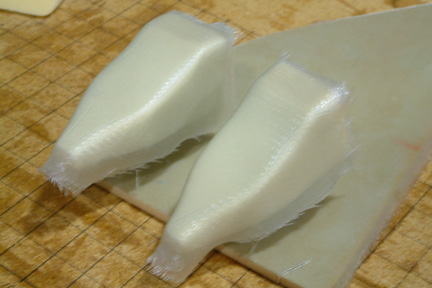 I
traced the air scoop views from the plan and carved 2 foam blocks
accordingly. I held them up on long nails, covered them with sealing tape (for mode
release) and glassed with 2 plies of BID (left). After they cured, I popped them
off and trimmed them per plan.
I
traced the air scoop views from the plan and carved 2 foam blocks
accordingly. I held them up on long nails, covered them with sealing tape (for mode
release) and glassed with 2 plies of BID (left). After they cured, I popped them
off and trimmed them per plan.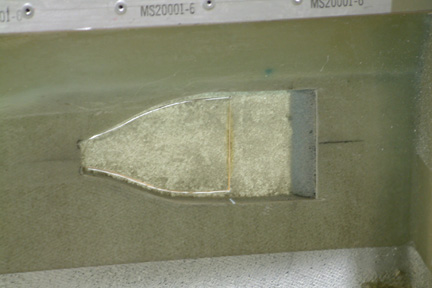 I
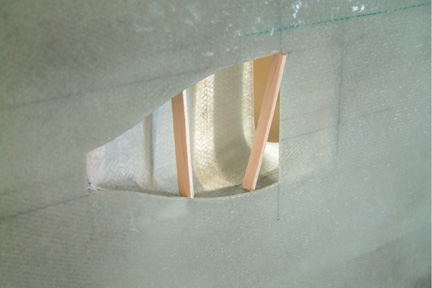
took the measurement from the plan and cut out both the outside and inside of
the fuselage. The only challenge in this task is to match up the inside scoop
pattern to the outside one. Once I cut out the outside pattern, I used a very
fine drill bit and drilled 4 small holes from each corner (of the outside
pattern) straight through to establish the position of the outside pattern. The
rest was straight forward.
I
took the measurement from the plan and cut out both the outside and inside of
the fuselage. The only challenge in this task is to match up the inside scoop
pattern to the outside one. Once I cut out the outside pattern, I used a very
fine drill bit and drilled 4 small holes from each corner (of the outside
pattern) straight through to establish the position of the outside pattern. The
rest was straight forward.  I
trial fit the air scoop onto the inside cavity - it fits well. However, the exit
of the air scoop is so close to the forward face of the IP, there is hardly any
room for transition from the rectangular shaped scoop to a round tube that connects to
the eyeball vents, especially if the eyeball vents are mounted at the plans
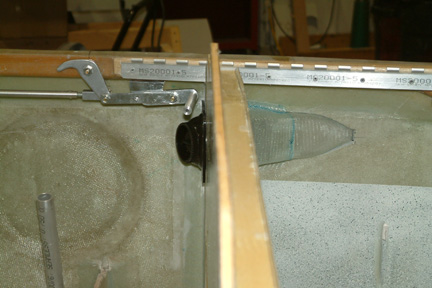
location. After much agony, I
decided to stay with a rectangular/square shape per
plan. Due to the location of my canopy locking mechanism, I decided to position
the vent opening at the same level of the air scoop (4" below the
longerons) and all the way against the fuselage sides. Due
to the new eyeball vent location, I only need three (3) sides for the transition
duct. I cut some scrap foam and fit them against the molded internal scoops.
I
trial fit the air scoop onto the inside cavity - it fits well. However, the exit
of the air scoop is so close to the forward face of the IP, there is hardly any
room for transition from the rectangular shaped scoop to a round tube that connects to
the eyeball vents, especially if the eyeball vents are mounted at the plans
location. After much agony, I
decided to stay with a rectangular/square shape per
plan. Due to the location of my canopy locking mechanism, I decided to position
the vent opening at the same level of the air scoop (4" below the
longerons) and all the way against the fuselage sides. Due
to the new eyeball vent location, I only need three (3) sides for the transition
duct. I cut some scrap foam and fit them against the molded internal scoops.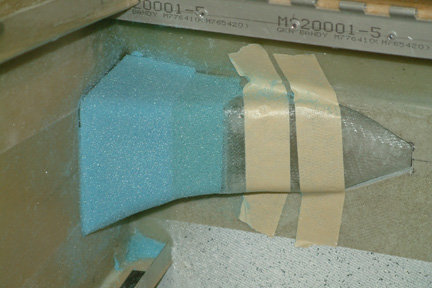 Then
I terminated the transition duct end to a 3"x3" opening. The opening
can be a bit smaller, but I decided to give myself a little bit of tolerance,
just in case I move the eyeball vent a bit. Shaping the foam was not difficult -
it took me about 15 minutes.
Then
I terminated the transition duct end to a 3"x3" opening. The opening
can be a bit smaller, but I decided to give myself a little bit of tolerance,
just in case I move the eyeball vent a bit. Shaping the foam was not difficult -
it took me about 15 minutes.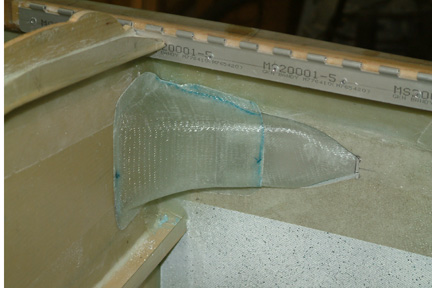 I taped the foam (mold release), glassed with 2 plies of BID and trimmed
after cure... I have not attached the transition duct nor drilled the hole for the eyeball vent at this
time... just checking
I taped the foam (mold release), glassed with 2 plies of BID and trimmed
after cure... I have not attached the transition duct nor drilled the hole for the eyeball vent at this
time... just checking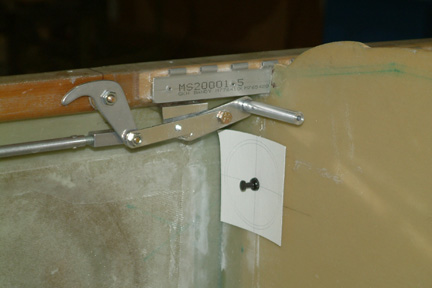 However,
I drilled a small center hole (1/16") through the IP. I made a paper
template the same size as the eyeball vent and trial fit with a stick pin. Its just
below my canopy lock. If I forget to lock my canopy, the handle will be right in
front of the air vent.
However,
I drilled a small center hole (1/16") through the IP. I made a paper
template the same size as the eyeball vent and trial fit with a stick pin. Its just
below my canopy lock. If I forget to lock my canopy, the handle will be right in
front of the air vent.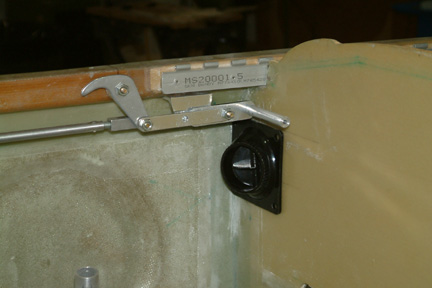
 I
just cannot foresee making a smooth transition inside the air scoop using the
plans approach per Fig. 84. I believe the intent for bending the outside skin
inward is to provide a smooth air flow at the scoop inlet (minimize turbulence).
However, trying to blend the rest of the skin to the inner surface of the air
scoop would be a challenge. I decided to cut the outer skin off and form the
transition with micro instead. First step was to flox the first part of my air
scoop in place. Holding it in place was a bit of a challenge - until a couple of
stir sticks from Starbucks and my hot glue gun came to the rescue
I
just cannot foresee making a smooth transition inside the air scoop using the
plans approach per Fig. 84. I believe the intent for bending the outside skin
inward is to provide a smooth air flow at the scoop inlet (minimize turbulence).
However, trying to blend the rest of the skin to the inner surface of the air
scoop would be a challenge. I decided to cut the outer skin off and form the
transition with micro instead. First step was to flox the first part of my air
scoop in place. Holding it in place was a bit of a challenge - until a couple of
stir sticks from Starbucks and my hot glue gun came to the rescue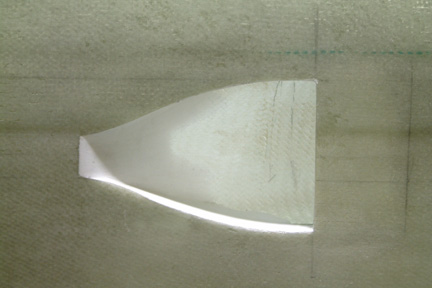 Once
cured, I put duct tape all around the air scoop. Then I applied thick micro
along the forward and side edges of the scoop (to smooth out the air
flow). The next day (after the micro cured), I sanded smooth the transition
(forward) edge. Then I added 2 plies BID at the inside step (inside the air
scoop) per plan.
Once
cured, I put duct tape all around the air scoop. Then I applied thick micro
along the forward and side edges of the scoop (to smooth out the air
flow). The next day (after the micro cured), I sanded smooth the transition
(forward) edge. Then I added 2 plies BID at the inside step (inside the air
scoop) per plan.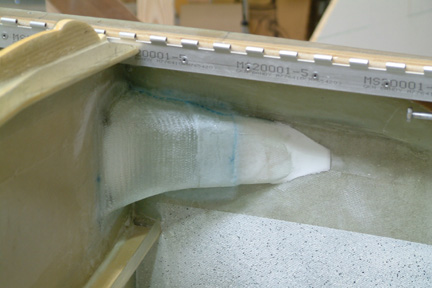 After
all is cured, I filled the gaps around the duct with left over micro. After
cure, I sanded it smooth.
After
all is cured, I filled the gaps around the duct with left over micro. After
cure, I sanded it smooth.