Chapter 19 - Section 12A

Wing Levelers


Throughout the building process, I have to mount the wings onto the spar and then remove them later on. I always dreaded these occasions because the wings are heavy, bulky and a pain to line up to the bolt holes. It always took Susann and me quite a while to get the wings mounted. I looked into the Cozy archives, checked out many web sites and talked to many builders. The accepted method is to place the wing on one (or two) stools with casters, move the wing close to the spar, shim the wing with foam blocks and with some wrestling and luck, get the top outboard bolt in first. Then maneuver the wing to get the inboard upper bolt in, followed by the outboard lower bolt.


My main concern with this mounting method is that after the first bolt (upper outboard bolt) is in, the entire weight of the wing is hanging onto this bolt. In addition, the maneuvering of the wing (to line up to other bolts) puts a tremendous amount of stress on the bolt and the hard point in the spar. If the bolt ever gets bent or hard point damaged, it will require a tremendous effort to repair the wing and spar - something I do not look forward to.


I have 2 different wing levelers. One is for measuring the angle of the wing AFTER the wing angle level board (during its building process) is removed. The second leveler is for lining up the wings to the spar for mounting.


Wing Angle Level Board

To most builders, once the wing angle level board is removed, it will be difficult to measure the wing angle again. I left the wing angle level board bondoed in place for as long as I could until I reached Chapter 25, Sanding and Priming section. In order to retain that function, I came up with a simple widget to replace the bondoed wing angle level board.


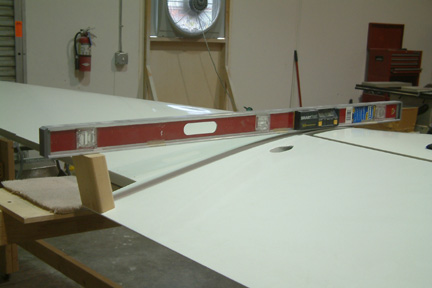
Before I removed the wing angle level boards, with the wings attached to the spar, I leveled the fuselage fore and aft and side to side. I placed my digital level on the wing level board and noted its reading. In my case, my left wing is 0.0 degrees and the right wing is at 0.2 degrees up. Then I rested my long digital level on top of the wing (close to the outboard end of the spar) and raised the back end of the digital level slowly, until I got the same reading as the wing level board. I took 2 measurements:

1) the distance between the bottom of the digital level and the TE of the wing (Height H); and

2) the distance between the TE of the wing and the resting spot of the digital level.


Based on those measurements, I can calculate the angle (A) between the digital level and the surface of the wing. I cut a 2 x 4 wood block with the height (H) and slanted top of the block. The slanted top allows the digital level to rest flush on the top of the block. Since the entire contraption is just a simple wood block, I can replicate the angle of the wing as needed in the future, without relying on the original wing leveler board.
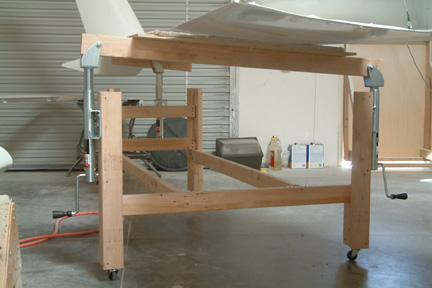
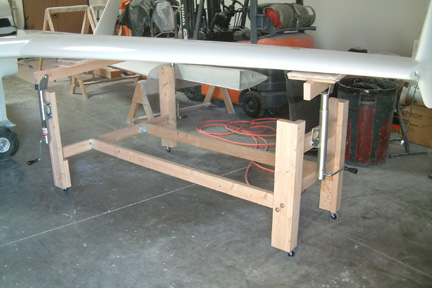
 

Wing Leveler for Mounting the Wing to the Spar

Mounting the wings onto the spar requires a considerable amount of lifting and finesse. Due to the weight of the wings and the tight tolerance of the mounting holes, it normally requires 2 people. Susann and I did it several times and it has never been a fun task for us. We learned that the best approach is to fit in the top outboard bolt first, then the inboard bolt and finally, the lower outboard bolt.


The part that worries me most is after the first bolt (top outboard bolt) is in, the entire wing is hanging off that bolt and one of us tries to maneuver the wing to line up the inboard holes. I can just hear the creeks (under stress) on that single bolt and the hard point. If that bolt/hard point ever got bent or twisted/distorted (even slightly), it will ruin the wing alignment and it will take a tremendous amount of work to repair.


I posted the question to the Cozy forum as well as talking to many builders for a better approach without much luck. Most of them just use a roller cart or stool, shim the wings and go at it - maybe with extra help. I am just not happy with the set up - maybe I just worry too much. Robert Asis posted an e-mail to the group on his newly designed wing leveler for mounting the wings. It was a clever idea so I went by his hangar and took a closer look. After some discussion, he modified his original design and came up with Version 2. Thank you Robert for the good idea. I decided to copy with some modification - a three point system instead of a 4 point system (discussed below).


I started with a 4 post frame structure as shown. One end of the wing leveler is 4 feet wide while the opposite side is 2 feet. The two (2) horizontal posts are 6 feet long. 
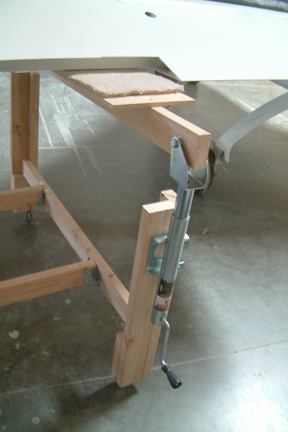
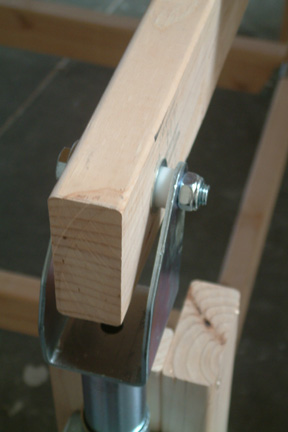
The entire frame is made out of 2 x 4's from Lowes. I used bolts to connect the horizontal posts to its sides because if they are not in use, I can disassemble and pack them into a tight space.


The 4 wheels at the bottom are from Harbor Freight for $2.99 each. The most expensive components are the three (3) camper jacks from Harbor Freight at $26 each. I waited for their 25% discount coupons to save a few bucks. Note that the wheels of the camper jacks were removed and are mounted upside down for this application. I was pleasantly surprised by the fine resolution of the jacks. Each jack is rated for 1,000 lbs.


Here's another view of my three point wing leveler. The foreground horizontal support beam can be raised or lowered by the 2 camper jacks - to adjust the fore/aft angle of the wing.


The third camper jack (background) supports a single beam at the middle. It is free to tilt in accordance to the foreground jacks. Its only function is to raise/lower the side-to-side angle of the wing during alignment.


Here's a closer view on how the camper jacks are mounted. Note that I added a flat board on top of the 2x4 - just to increase the contact area between the lift and the bottom of the wing. The carpet provides a bit more protection to the wing surface as well as anti-skid function.


Since the fork for the camper jacks are for wheels that are wider than a 2x4, I had to add a spacer on each side of the 2x4. I happen to have a Teflon rod around. I drilled a 5/8" hole through its center that made a set of smooth spacers for all three bolts.


[Hindsight] The wing leveler worked out really well. I can now align the wing and mount it onto the spar by myself. The alignment task took me about 15 minutes at most. Once the three holes are lined up, I took a magnet and pulled the bolts through and I can take my time to tighten each bolt accordingly.


I know there are other ways to mount the wings, however, this approach, by far, is the easiest and with no stress.