Chapter 23 - Section 8
Oil Cooler
I spent hours and hours gathering information and
pondering over my oil cooler mounting location. From all the information I
gathered, there are three popular locations:
1) at the top center of firewall, right underneath the
upper cowling (per plan);
2) by the wing root behind the strake;
3) below the engine forward of the alternator and starter
(Plans do not recommend).
I heard successes and failures with all three
installation locations. Makes you wonder what is the real recipe to make each of these
locations work. I believe the two key elements are:
1) how well the engine baffles seal the incoming air from
escaping and directing it to its intended exit route;
2) ensure a venting channel and low pressure port at the
exit side of the oil cooler - that promotes good air flow through the fins of the
oil cooler.
My first preference was to place the oil cooler under the
engine (3) because I do not have to cut a big hole on the cowling for exit air. I
spent hours in evaluating the appropriate oil cooler for under the engine. I
believe the Stuart Warner 8432R is the preferred cooler for that particular
location. This oil cooler costs ~$650 and its small. I made a paper mock up and
tried to fit it under my cowl. Surprisingly, I found limited to tight space for it.
The one thing I do not like is the long hoses need for this mounting location.
The Plans actually consider this not the most appropriate location for the oil
cooler.
I decided to take a second look at the alternatives. Clark
Canedy and Buly Aliev both had success with the firewall mounting location per Plan. I
happen to have the same engine as Clark. After multiple discussions with
both and others, I decided to mount my oil cooler as they did and per Plan. Is
this a good decision? I dunno... I'll report back after my first flight.
 Based
on Cozy builder consensus, it is easier to deal with too much cooling than not
enough cooling. Since my firewall mounting location is spacious enough to
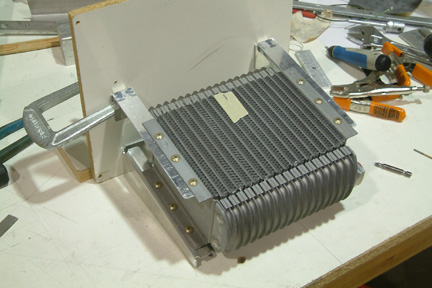
accommodate a 17-row cooler (same as Clark's), I decided to get the same -
Aero-Class PN# 08-00644 ~$340. Besides,
it is certainly much cheaper than the Stuart Warner equivalent.
Based
on Cozy builder consensus, it is easier to deal with too much cooling than not
enough cooling. Since my firewall mounting location is spacious enough to
accommodate a 17-row cooler (same as Clark's), I decided to get the same -
Aero-Class PN# 08-00644 ~$340. Besides,
it is certainly much cheaper than the Stuart Warner equivalent.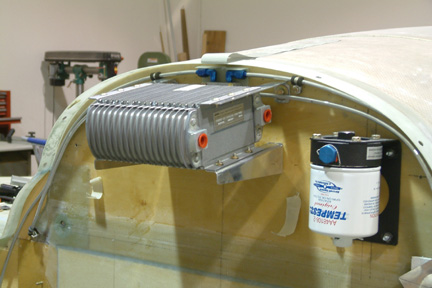 Here's
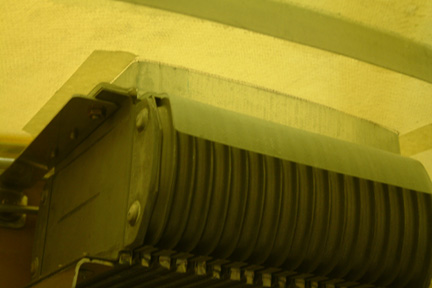
a picture with the oil cooler mounted at the fire wall.
Here's
a picture with the oil cooler mounted at the fire wall.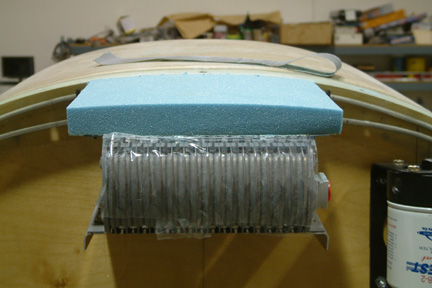 As
discussed above, the cooler vent is an important component to promote good air
flow from the pressurized cowling to the outside. Since the top cowl is curved,
the cooler vent must conformed. I doubled sided a 2" soft foam block on top of the oil
cooler and shaped the top of the foam with the straight edge sanding block.
As
discussed above, the cooler vent is an important component to promote good air
flow from the pressurized cowling to the outside. Since the top cowl is curved,
the cooler vent must conformed. I doubled sided a 2" soft foam block on top of the oil
cooler and shaped the top of the foam with the straight edge sanding block.
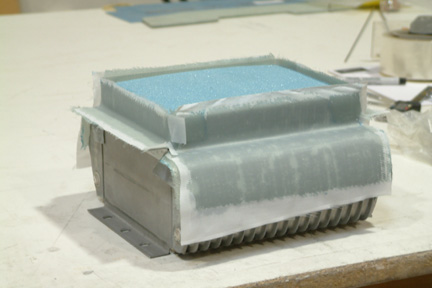 Once
I was happy with the foam block, I moved the oil cooler and foam onto the work
bench for glassing. I laid up 3 layers of BID and made my initial oil cooler
vent. I soon realized all the shaping with the foam was not really necessary
Once
I was happy with the foam block, I moved the oil cooler and foam onto the work
bench for glassing. I laid up 3 layers of BID and made my initial oil cooler
vent. I soon realized all the shaping with the foam was not really necessary
 Then,
I realized I needed to mark and cut the exit hole at the cowling first. Otherwise
the upper half of the vent will block off the vent opening for marking onto the
cowling. Note I used masking tape to mark the hole location because there's
such a tight space, I have difficulty in sticking a pen in.
Then,
I realized I needed to mark and cut the exit hole at the cowling first. Otherwise
the upper half of the vent will block off the vent opening for marking onto the
cowling. Note I used masking tape to mark the hole location because there's
such a tight space, I have difficulty in sticking a pen in.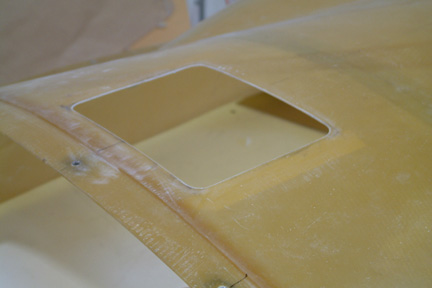 I
am always apprehensive in cutting a big hole on any part of the plane.
Nonetheless, I charged forward. I started with a 1" hole saw at all 4 corners.
Then I connected them up with my FEIN tool and straight edge sanding block.
I
am always apprehensive in cutting a big hole on any part of the plane.
Nonetheless, I charged forward. I started with a 1" hole saw at all 4 corners.
Then I connected them up with my FEIN tool and straight edge sanding block.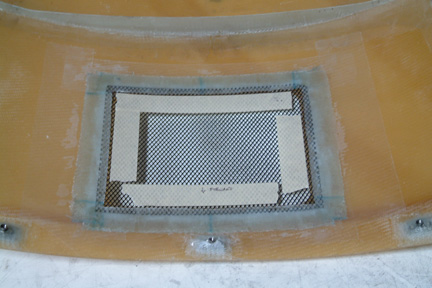 Some
how, I needed to cover up this big hole. I borrowed another idea from Buly and picked
up a metal mesh screen file holder from Staples. I ground off its metal frame and used the screen
material (sheet) as a cover. At least to keep larger debris out of the oil
cooler fins. I trimmed the screen to shape and sandwiched all 4 edges with flox and
BID - forming a picture frame (2 BID on each side + flox between the screen
material). The reason I added flox is to provide added stiffness to the screen -
conforming to the curvature of the cowl. The masking tape was there for
alignment during the glassing process.
Some
how, I needed to cover up this big hole. I borrowed another idea from Buly and picked
up a metal mesh screen file holder from Staples. I ground off its metal frame and used the screen
material (sheet) as a cover. At least to keep larger debris out of the oil
cooler fins. I trimmed the screen to shape and sandwiched all 4 edges with flox and
BID - forming a picture frame (2 BID on each side + flox between the screen
material). The reason I added flox is to provide added stiffness to the screen -
conforming to the curvature of the cowl. The masking tape was there for
alignment during the glassing process.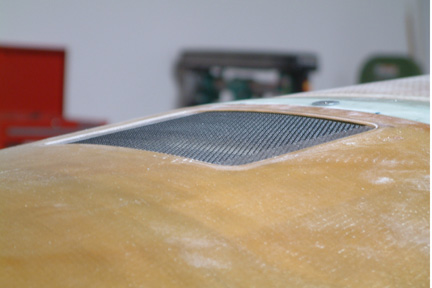 Here's
a picture of the screen after it was completed. Since the upper cowl is not that
thick, the screen looked flush without additional effort.
Here's
a picture of the screen after it was completed. Since the upper cowl is not that
thick, the screen looked flush without additional effort.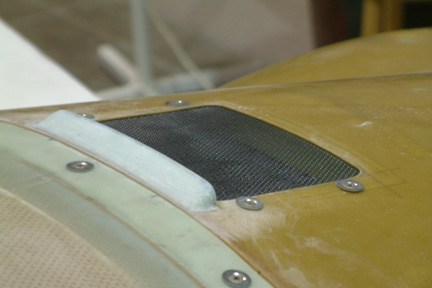 Per
Plan, an optional deflector can be added ahead of the oil cooler vent to create
a low pressure zone at the oil cooler vent exit. This will help to draw the
higher pressure air inside the cowl to escape through the vent. I decided to add
the deflector at this time. As all Cozy builder know, it is easier to deal with
too much cooling than not enough.
Per
Plan, an optional deflector can be added ahead of the oil cooler vent to create
a low pressure zone at the oil cooler vent exit. This will help to draw the
higher pressure air inside the cowl to escape through the vent. I decided to add
the deflector at this time. As all Cozy builder know, it is easier to deal with
too much cooling than not enough.