Removing the Play-Doh
 After
the glass cured, I removed the peel-ply and, as expected, I was not able to
pop the gear cover off - the fairings were in the way
After
the glass cured, I removed the peel-ply and, as expected, I was not able to
pop the gear cover off - the fairings were in the way .
Fortunately, my wings were off the plane at this time. So I took the
opportunity to turn the plane over and do some extra work on the bottom of the
plane. After the plane was turned over, I removed the main gear together with
the gear cover.
.
Fortunately, my wings were off the plane at this time. So I took the
opportunity to turn the plane over and do some extra work on the bottom of the
plane. After the plane was turned over, I removed the main gear together with
the gear cover.
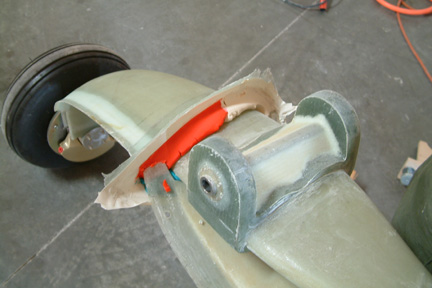
Here, you can see the play dough that fills out the
fairing cavity with the gear cover stuck in the midst. I trimmed off the sharp
edges along the fairing and started to remove the white
electrical tape and Play-Doh. Surprisingly, that was quite a chore -
especially right at the seam where the fairings start. The electrical tape and
'dried' Play-Doh did not want to come loose and I do not have any really thin
tool that is rigid enough to scrape it out. All in all, it took me several hours
to clear them out (at least as much as I could).
 I
took the carpenter widget and traced out the surface profile of the gear leg next
to the fuselage. I transferred the profile to a cardboard and added 2" all
around the outline. With the cutout template, I fitted it to the gear leg /
fuselage intersection and traced the outline onto the fuselage. Based on
that outline, I used a 2" dowel and projected an opposing outline back onto the
gear leg (starting point of the fairing).
I
took the carpenter widget and traced out the surface profile of the gear leg next
to the fuselage. I transferred the profile to a cardboard and added 2" all
around the outline. With the cutout template, I fitted it to the gear leg /
fuselage intersection and traced the outline onto the fuselage. Based on
that outline, I used a 2" dowel and projected an opposing outline back onto the
gear leg (starting point of the fairing).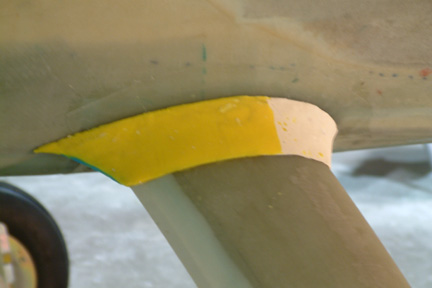 You
can find many different ways to make the fairings. My main concern was making
the right similar to the left. Cutting foam and shaping it would be easy, but a
bit permanent. In other words, there is a point of no return if you sand it down too much. I decided to
follow Jon Dembs approach - using Play-Doh as the shaping material. K-Mart
sells a Play-Doh set that comes in 4 colors - each in a small can. with the
help of a paper tube and a long socket (with an extension), I was able to shape
(roll) the play dough to a relatively pleasing shape. I used 2 1/2 cans of Play-Doh per fairing.
You can see my two tone fairing (left). It was getting late by the time I
completed the shaping of both legs, I decided to quit for the night.
You
can find many different ways to make the fairings. My main concern was making
the right similar to the left. Cutting foam and shaping it would be easy, but a
bit permanent. In other words, there is a point of no return if you sand it down too much. I decided to
follow Jon Dembs approach - using Play-Doh as the shaping material. K-Mart
sells a Play-Doh set that comes in 4 colors - each in a small can. with the
help of a paper tube and a long socket (with an extension), I was able to shape
(roll) the play dough to a relatively pleasing shape. I used 2 1/2 cans of Play-Doh per fairing.
You can see my two tone fairing (left). It was getting late by the time I
completed the shaping of both legs, I decided to quit for the night.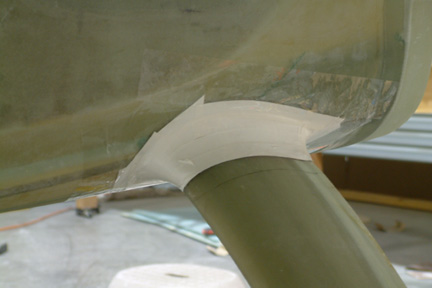 I
was surprised that the Play-Doh dried up overnight and developed voids and
cracks throughout. I wasn't thrilled about re-doing both fairings again. I
decided to tape it up with electric/packing tape to smooth out the dried up
bumps and cracks.
I
was surprised that the Play-Doh dried up overnight and developed voids and
cracks throughout. I wasn't thrilled about re-doing both fairings again. I
decided to tape it up with electric/packing tape to smooth out the dried up
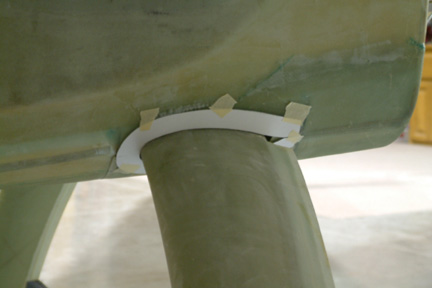
bumps and cracks. After
I got all the Play-Doh out of the cavity, I trimmed the edges of the fairing
to fit. I had to trim the inner fairing a bit more - to give room for removing
the gear cover. By doing so, I ended up with a 3/8" gap. I decided to cover it
up...
After
I got all the Play-Doh out of the cavity, I trimmed the edges of the fairing
to fit. I had to trim the inner fairing a bit more - to give room for removing
the gear cover. By doing so, I ended up with a 3/8" gap. I decided to cover it
up...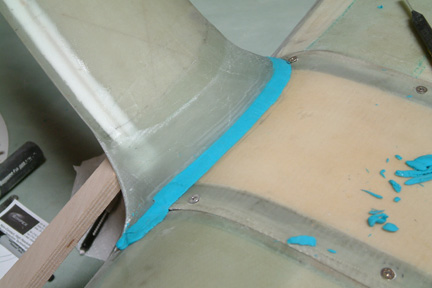 Using
Play-Doh again, I formed a transition between the gear fairing and the gear
cover (picture left).
Using
Play-Doh again, I formed a transition between the gear fairing and the gear
cover (picture left).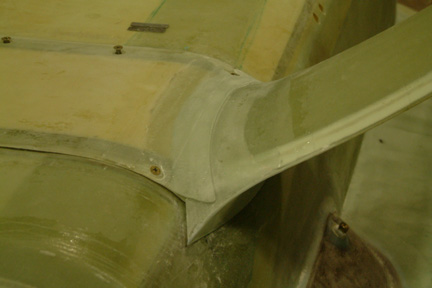 I
applied packing tape over the play dough and gear leg. Then I laid 4 plies of
BID onto the gear cover, overlapping the gear leg. After cure, I removed the
Play-Doh, & packing tape and trimmed to shape. Here's the final result.
I
applied packing tape over the play dough and gear leg. Then I laid 4 plies of
BID onto the gear cover, overlapping the gear leg. After cure, I removed the
Play-Doh, & packing tape and trimmed to shape. Here's the final result.