Tricks & Methods
This chapter is dedicated to the methods and tricks I used
throughout my Cozy building journey. By no means are these my ideas… in fact,
I learned most of them from builders before me, and friends & neighbors who
contributed their invaluable advice to support my goal. Therefore, I am
documenting them here and hope they can be useful to the next builder. I wanted
to acknowledge and give a BIG THANKS to those who came up with these great ideas
– well, you know who you are!
|
 I
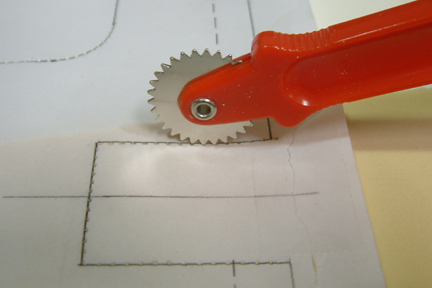
transferred the drawings onto the foam using a tracing wheel they use for sewing
(I learned this from the Cozy forum & various web sites). First, I tack the
drawings on the foam with a thumbtack and run the tracing wheel along the lines
of the drawing. The spokes on the wheel put a string of ‘indents’ on the
foam. Surprisingly, the tracing wheel tracks a straight line quite well even in
free hand. Remove the drawings and connects up the dots with a fine felt
tip pen. Though the tracing wheel leaves a bunch of holes on the drawings, they
are readable and can be reused – wonder how I know (hint… you normally
have to re-trace & remake a part if you screw up). Regardless, this
method worked very well! I
transferred the drawings onto the foam using a tracing wheel they use for sewing
(I learned this from the Cozy forum & various web sites). First, I tack the
drawings on the foam with a thumbtack and run the tracing wheel along the lines
of the drawing. The spokes on the wheel put a string of ‘indents’ on the
foam. Surprisingly, the tracing wheel tracks a straight line quite well even in
free hand. Remove the drawings and connects up the dots with a fine felt
tip pen. Though the tracing wheel leaves a bunch of holes on the drawings, they
are readable and can be reused – wonder how I know (hint… you normally
have to re-trace & remake a part if you screw up). Regardless, this
method worked very well!
|
|
 I
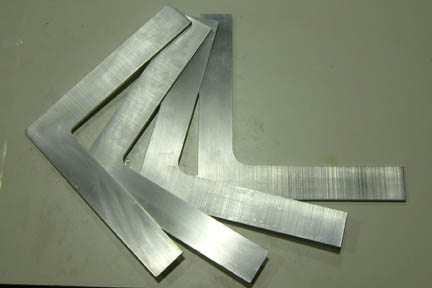
did not like the inconsistencies of inside rounded corners I made on the I
did not like the inconsistencies of inside rounded corners I made on the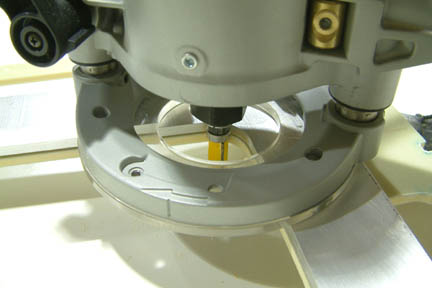 Instrument Panel – simply because I do not have that perfect freehand skill
– like a professional carpenter. There's got to be a
better way… I went to a machine shop and had set of angled
templates with round corners made (.125", .25", .5" & .75"
radius respectively). The templates are .25" thick aluminum. With the appropriate
template clamped onto the top of the inside corners of the Instrument Panel, I used
a flush trim router bit and ran it along the edge of the template. I used
½” diameter bit or smaller – you can find them in most hardware stores or
on the Internet. These templates help shape the foam and fiberglass to a nicely
rounded inside corner every time!
Instrument Panel – simply because I do not have that perfect freehand skill
– like a professional carpenter. There's got to be a
better way… I went to a machine shop and had set of angled
templates with round corners made (.125", .25", .5" & .75"
radius respectively). The templates are .25" thick aluminum. With the appropriate
template clamped onto the top of the inside corners of the Instrument Panel, I used
a flush trim router bit and ran it along the edge of the template. I used
½” diameter bit or smaller – you can find them in most hardware stores or
on the Internet. These templates help shape the foam and fiberglass to a nicely
rounded inside corner every time!
|
|
 One of the
contributors for poor part quality on my parts (discussed in Chapter 4) was due to low
curing temperature (below 70F). Therefore, a heat tent, of sorts, was in order.
Since my Cozy factory is in a large warehouse without heating and cooling and it
would be impractical to heat up the entire warehouse, I needed to find
ways to provide local heating. One of the
contributors for poor part quality on my parts (discussed in Chapter 4) was due to low
curing temperature (below 70F). Therefore, a heat tent, of sorts, was in order.
Since my Cozy factory is in a large warehouse without heating and cooling and it
would be impractical to heat up the entire warehouse, I needed to find
ways to provide local heating.
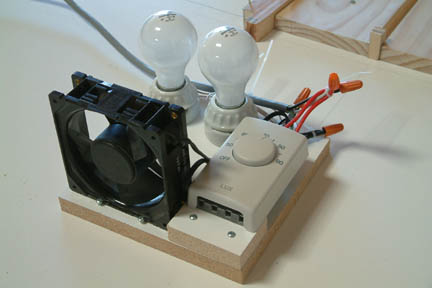
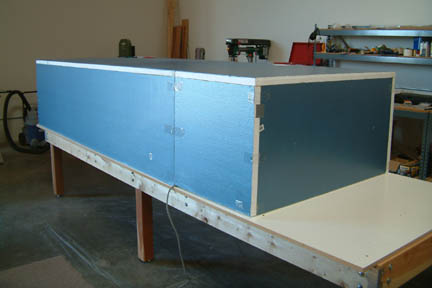
The local heat tent
is made up of three 4'x8' foam panels (~$10 each). The three panels provide
enough material for a 4'x10'x2' tent (as shown). I also cut up some scrap foam
strips and glued them to the tent corners and joining edges - making the tent 'box'
much more rigid and sturdy for handling.
The heating unit is
made up of two 100 watt light bulbs, a small fan (to circulate the air inside
the heat tent) and an in-line thermostat. Once the tent is in place, I slipped the
heating unit inside the tent and plugged in the power. The heating unit was able to
keep the temperature inside the tent within 80F constantly - just about perfect.
Time will tell if it is worth the effort.
|
|
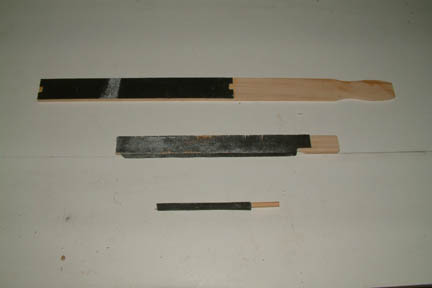
I read this from
someone's site and followed... I went by Home Depot and picked up several paint
stirrers. They have two sizes - you'll find them both useful. I laid a 8"x11" sand paper
face down and brushed on left-over epoxy on its back. I
then placed the paint stirrers on the epoxied side - butt up against each other.
After cure, I used a razor blade and cut along the edges of the paint stirrers.
You'll end up with sanding sticks for all occasions. I used this to sand down
the heat duct at the aft spacers (Chapter 5). Worked
great!
|
I
started with a rubber squeegee during my practice lay ups and early part of
Chapter 4. I soon got tired of cleaning them - especially when I forget to clean
them by the end of the day. Replacements are somewhat costly in the long run. Then
I started using credit cards instead of the rubber squeegee (I am sure this is
not original). I get a lot of junk ones in the mail all the time, therefore, I
have a constant supply of squeegees for FREE!
Here's
my experience with them:
 |
Firstly,
I can wipe the epoxy/micro off the cards easily and if I forget, I just toss them - they are FREE; |
|
Note
that these credit cards comes in different thicknesses. I like the American
Express ones for applying micro onto foam because they are a bit thinner and
tend to bend and slide over the foam nicely (ie. they won't dig into the
foam). On the other hand, I like the Delta Airlines ones better for applying
epoxy on glass because they are a bit firmer; |
|
Sometimes
I trim the credit card into strips for tight places (e.g. applying flox to
round off the acute corner at the base of the front seat back in Chapter 6); |
|
Sometimes
I sharpen or dull the contact edge of the card for rubbing down the peel ply
or plastics. |
Generally,
they worked well for me. You may want to try them out... Just
make sure you use the junk credit cards and not your significant other's  .
As a matter of fact , I think I am going to write a thank you note to American
Express and Delta Airlines for the free squeegees...NOT!
.
As a matter of fact , I think I am going to write a thank you note to American
Express and Delta Airlines for the free squeegees...NOT!
This
is one task I do not wish any builder will have to face. However, if you must,
this is one approach that made my life a bit easier. According to plan, MG-1,
MG-2 and MG-4 need to be floxed in place to support the landing gear shaft. As
I did mine, the MG-1 moved (mysteriously of course) just a bit during cure, such
that the landing gear shaft will not go through.
After
I popped off the MG-1 plate, the bushing was still in tact. To push it out, I
used a knock out punch for the task...
|
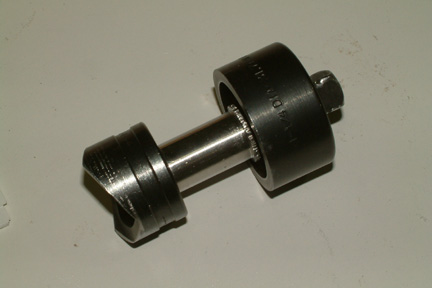
 A
knock out punch is a tool commonly used in the sheet metal manufacturing
processes for shearing a pre-determined hole (size & shape) in a sheet of metal. It will
provide a nice clean hole compared to using a jig saw or band saw. A knock out
punch consists of a base, a pre-shaped die (i.e. the punch) and a threaded screw
through the center of both components. The punch comes in round, square,
rectangular shapes and in variety of sizes. As you tighten the screw (shown),
the punch will eventually shear a nice clean hole out of the sheet metal. A
knock out punch is a tool commonly used in the sheet metal manufacturing
processes for shearing a pre-determined hole (size & shape) in a sheet of metal. It will
provide a nice clean hole compared to using a jig saw or band saw. A knock out
punch consists of a base, a pre-shaped die (i.e. the punch) and a threaded screw
through the center of both components. The punch comes in round, square,
rectangular shapes and in variety of sizes. As you tighten the screw (shown),
the punch will eventually shear a nice clean hole out of the sheet metal.
|
|
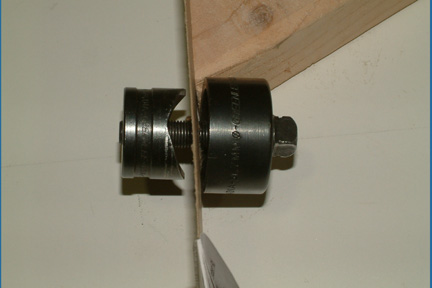
 I
used the same idea for pushing the MG-4 bushing out of the LG bulkhead, except I
reversed the orientation of the cutting die (shown). As I tightened the bolt with
a socket wrench, the back of the punch pushed the bushing (nice & flat)
forward until it was flush against the glass. I removed the punch, added a drop of
oil on the exposed bushing that is close to the glass, reversed the punch
direction and worked it back in. By repeating the process a couple times, the
bushing came right
out!!! I
used the same idea for pushing the MG-4 bushing out of the LG bulkhead, except I
reversed the orientation of the cutting die (shown). As I tightened the bolt with
a socket wrench, the back of the punch pushed the bushing (nice & flat)
forward until it was flush against the glass. I removed the punch, added a drop of
oil on the exposed bushing that is close to the glass, reversed the punch
direction and worked it back in. By repeating the process a couple times, the
bushing came right
out!!!
|
Applying
and Smoothing Flox
I
picked up the general approach to this technique from one of many web sites I
read (don't remember who's) before I started building the Cozy. It turned out to be one
of the techniques, that I used often, for making smooth flox fillets. Here's
an example of how I make my flox fillets:
|
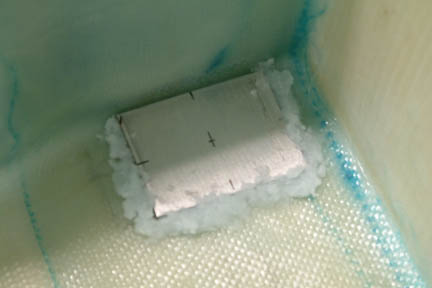 I
was applying a flox fillet around an aluminum hard point, but this technique works
on just about any fillet application as called out in the plans. I first
applied DRY flox around the edges of the aluminum hard point. Its a bit lumpy
and does not
have to lay perfect. Just make sure there is an even amount (roughly) along the
fillet edges. I
was applying a flox fillet around an aluminum hard point, but this technique works
on just about any fillet application as called out in the plans. I first
applied DRY flox around the edges of the aluminum hard point. Its a bit lumpy
and does not
have to lay perfect. Just make sure there is an even amount (roughly) along the
fillet edges.
|
|
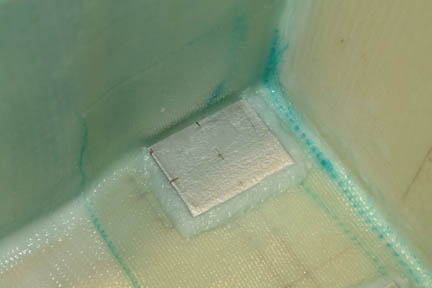 Right
before I was ready to glass over the hard point, I use a soft brush (or a
brush with longer hair (i.e. >1" or so) and dip it in pure epoxy. Remove
excess epoxy from the brush by sliding it over the edge of epoxy mixing cup as you
always do. Then brush over the DRY flox LIGHTLY. The flox will absorb the epoxy from the brush and 'melts' (smooth) to shape nicely. You'll get the hang of it once you have
done it... Right
before I was ready to glass over the hard point, I use a soft brush (or a
brush with longer hair (i.e. >1" or so) and dip it in pure epoxy. Remove
excess epoxy from the brush by sliding it over the edge of epoxy mixing cup as you
always do. Then brush over the DRY flox LIGHTLY. The flox will absorb the epoxy from the brush and 'melts' (smooth) to shape nicely. You'll get the hang of it once you have
done it...
|
|
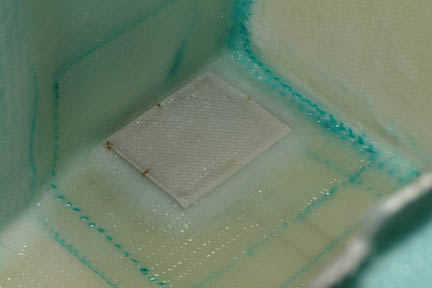 Apply
pre-wet glass over the entire hard point and fillet. Touch up the fillets lightly with
the soft brush, to desired perfection. Apply
pre-wet glass over the entire hard point and fillet. Touch up the fillets lightly with
the soft brush, to desired perfection.
|
Fitting
a Small Washer in Tight Space
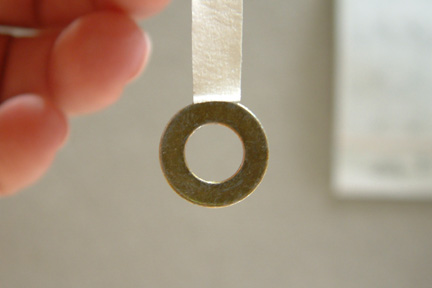 There
are times that you need to hold a thin washer in really tight spaces such that
you can fit a bolt or rod through it. A good example is in Chapter 12 when
installing the elevators to the canard. There is no room (even for pointed
nose pliers) to hold the washer on its sides nor can you grab onto its flat
surface while trying to push the rod through. Here's how I did it: There
are times that you need to hold a thin washer in really tight spaces such that
you can fit a bolt or rod through it. A good example is in Chapter 12 when
installing the elevators to the canard. There is no room (even for pointed
nose pliers) to hold the washer on its sides nor can you grab onto its flat
surface while trying to push the rod through. Here's how I did it:
I
used a small piece of masking tape and stuck it to the edge of the washer - now,
the washer is dangling by its edge. Lower the washer in the slot, stick the bolt
or rod through the center hole of the washer, pull off the masking tape and you
are done. Its simple and works great!
|
Brushes,
Re-use Or Not-Re-Use
You
will find many discussion in the archives regarding re-use or not-re-use of the
brushes. I always felt that brushes are cheap, especially when you wait for a
sale from Harbor Freight and stock up. I used it once and tossed, no cleaning, no
mess... Besides, I tried to clean the brushes a couple of times and can never
re-use them because they stiffed up like a chisel afterwards.
I
got a chance to talk to Paul Stowitts (who prefers to re-use his brushes) a while
back and picked up some of his cleaning techniques. I then realized I missed a
couple of cleaning steps... A bit later, I included those missing steps and to
my surprise, it worked very well. The brushes stayed softer than new ones and NO
loose hair ever again - I like it!
|
Here's
what I did for cleaning and preparing the brushes for re-use:
Step
1 - After
use, I squeezed out the residue epoxy with a paper towel (those 1/2 sheet ones or
whatever I can get my hands on). I normally squeezed it about 3-5 times, using
the same paper towel.
|
|
 Step
2 - I soaked a new paper towel (those 1/2 sheet ones) with Acetone and wrapped the wetted
part over the used brush. Step
2 - I soaked a new paper towel (those 1/2 sheet ones) with Acetone and wrapped the wetted
part over the used brush.
|
|
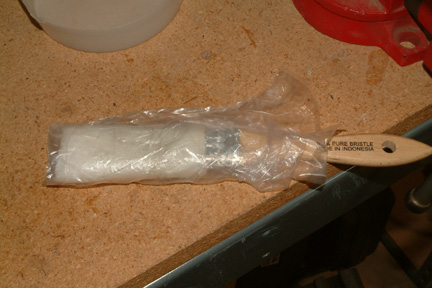 Step
3 - I tucked the whole thing inside a sandwich bag and wrapped it tight around itself. Step
3 - I tucked the whole thing inside a sandwich bag and wrapped it tight around itself.
|
|
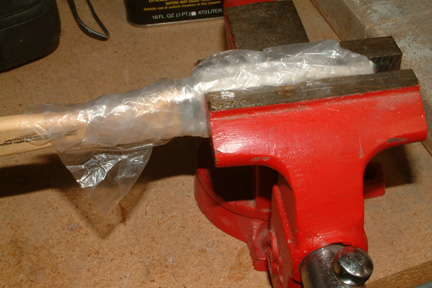 Step
4 - I squeezed the brush part between a vise or some weight. BTW, you do not have to
kill it with the vise. Step
4 - I squeezed the brush part between a vise or some weight. BTW, you do not have to
kill it with the vise.
The
next time you need a brush, just take it out of the vise and unwrap the plastic.
I like it, not because of cost reasons. It turned out to be a much softer and
smoother brush and works better than new ones. As I mentioned, no loose hair
either.
|
There
are times I need to drill a hole vertically through a cylindrical part, such as
a tube (Chapter 16) or a bolt (Chapter 13). For one reason or another, the
V-block was not handy, the part was too small or the hole just did not need to
be THAT perfect - one of those quick tasks... Here's what I do...
|
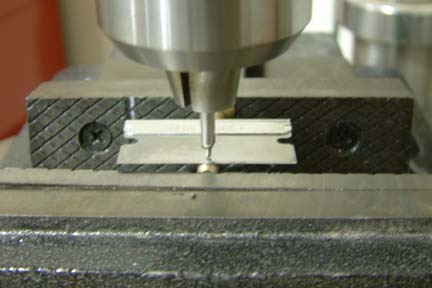 As
shown (left), I was drilling a hole through a AN3 bolt for a cotter pin. I first
clamp down the bolt in a vise and place it under my drill press. Then I lower
the drill bit against the top of the body of the bolt. Then I slip a razor blade
(or a straight metal ruler) between the tool tip and the bolt body. If the blade
is level, the drill bit is dead center to the apex of the bolt. On the other
hand, if the blade is tilted, you are off center. Move the vise (with the bolt)
a bit until the blade is level. A simple, but very effective
technique. As
shown (left), I was drilling a hole through a AN3 bolt for a cotter pin. I first
clamp down the bolt in a vise and place it under my drill press. Then I lower
the drill bit against the top of the body of the bolt. Then I slip a razor blade
(or a straight metal ruler) between the tool tip and the bolt body. If the blade
is level, the drill bit is dead center to the apex of the bolt. On the other
hand, if the blade is tilted, you are off center. Move the vise (with the bolt)
a bit until the blade is level. A simple, but very effective
technique.
|
Center
Section Spar & Wing Match Drilling Bit
To
use this Tool set, you must have an access hole on the under side of the Center
Section Spar (per plan). In addition, you are given the locations of the wing
bolts in Chapter 14 Page 5. I drilled a 1/4" hole at each of those
locations (i.e. Aft face of the center section spar). Then I transfer a matching
set of these 1/4" alignment holes onto the forward face of the center
center spar. Note that the FF alignment hole does not have the same BL location
as the AF ones (hint: look for the 2.02" dimension). These
alignment holes were intended as a guide for drilling the matching hole between
the Center Section Spar and Wing hard points such that the bolts comes out
perpendicularly to the aft face of the center section spar. Once you have the wing and center
section spar lined up and secured, then this Match Drilling Bit will come in handy as
follows...
|
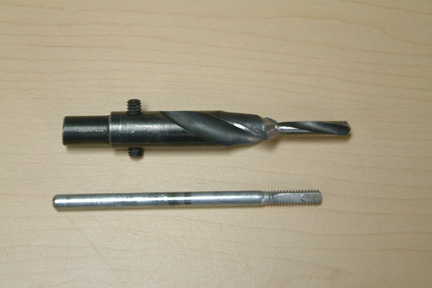 The
Match Drilling Tool set comes in 2 parts - the funny looking (customized) drill
bit and the 1/4" drill attachment rod. The
Match Drilling Tool set comes in 2 parts - the funny looking (customized) drill
bit and the 1/4" drill attachment rod.
|
|
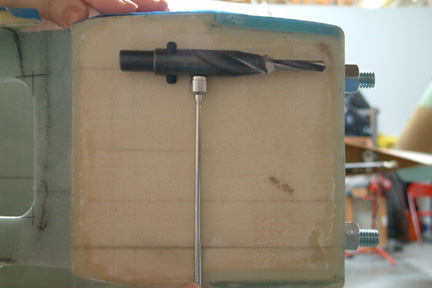 I
used an collapsible magnet to hold the Drill Bit and stick it through the access
hole at the under side of the Center Section Spar. Then I maneuver the drill tip
through the 1/4" alignment hole at the aft face of the Center Section Spar. I
used an collapsible magnet to hold the Drill Bit and stick it through the access
hole at the under side of the Center Section Spar. Then I maneuver the drill tip
through the 1/4" alignment hole at the aft face of the Center Section Spar.
|
|
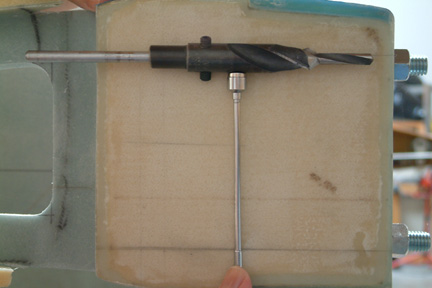 Then
I feed the 1/4" drill attachment rod through the 1/4" alignment hole
(at the forward face of the Center Section Spar) and into the back end of the
Drill Bit. Now the Drill Bit is hanging between the two 1/4" alignment
holes of the Center Section Spar. Pull out the magnet. Then
I feed the 1/4" drill attachment rod through the 1/4" alignment hole
(at the forward face of the Center Section Spar) and into the back end of the
Drill Bit. Now the Drill Bit is hanging between the two 1/4" alignment
holes of the Center Section Spar. Pull out the magnet.
|
|
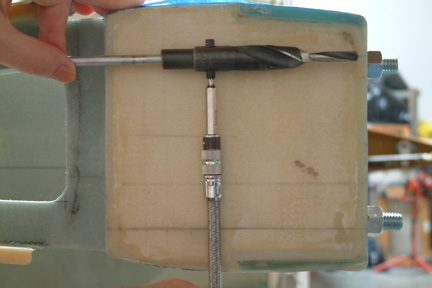 Carefully
rotate the 1/4" drill attachment rod such that its flat face sits against
either one of the 2 set screws. Use an extended Allen bit (as shown) and tighten the set
screw. Attached a hand drill to the end of the drill attachment rod and start
drilling. Carefully
rotate the 1/4" drill attachment rod such that its flat face sits against
either one of the 2 set screws. Use an extended Allen bit (as shown) and tighten the set
screw. Attached a hand drill to the end of the drill attachment rod and start
drilling.
|
It is important to note that a more powerful drill works much better.
I used a DeWalt 7.8A drill instead of my other Skill 3.5A electric drill. It cut
down my drilling time by 75%. It may be a good idea to make a trial run on a scrap
piece of aluminum - just to get a feel for the Tool
before going for the real thing!