Murphy
Strikes
After
everything was lined up, I filled the gaps between the spar and the fuselage
with flox, doing it in two stages - the front & top first, let cure
overnight, then the bottom. I did this because I have the shims at the bottom and I
do not want to flox them in. The next day, I double checked all the alignments
one more time (it was perfect), then I removed the bottom shims, and completed floxing the bottom gap.
While
I was waiting for the flox at the bottom gap to cure and calculating the BID tape requirement, I came across the M-8 drawing again and
it just dawned on me that I mounted the aft face of the spar FLUSH to the aft side
of the firewall - it should have been flush to the forward face of the
firewall.... Aaagh !!! A quick
call confirmed my intuition - I need to cut the spar out and re-do... The
partially cured flox (at the bottom) was not bad, I have to cut off the cured portions with my
FEIN and hack saw. What a mess... I did measure, measure and measure as all builders
would, I just didn't READ, READ and READ! After half a day of re-work/sanding and lots
of !@#$%, I was back on track.
!!! A quick
call confirmed my intuition - I need to cut the spar out and re-do... The
partially cured flox (at the bottom) was not bad, I have to cut off the cured portions with my
FEIN and hack saw. What a mess... I did measure, measure and measure as all builders
would, I just didn't READ, READ and READ! After half a day of re-work/sanding and lots
of !@#$%, I was back on track.
Floxing
the Spar to Fuselage - the Second Time
The
second time was a bit easier. I re-shimmed and clamped the spar in place, making sure
its 0o front to back and side to side (as the fuselage). Since I
moved the spar forward 1/4" it actually fits better and the gaps (at the
front) were smaller. I floxed all the
gaps as before and let cure.
Glassing
the Spar to Fuselage
Before
the glassing task, I roughed up all the areas and rounded off all corners with flox.
I also removed the rear most section of the torque tubes and covered up their brass bushings with masking tape. I
glassed the spar to the fuselage per plan with 5
layers of BID on all sides, except the 3 long BIDs between and spar and firewall
- they were 2 layers each. Once
completed, I re-confirmed its alignment and allowed to cure overnight.
Noodly
Effect
Once
the bolts were in, I placed the digital level on the level boards (spar and
wing) for verification. My spar showed 0.0o (same as the fuselage)
while both wings showed TE up by 0.2o . My first attempt to rectify
the mismatch was to add a thin washer (AN960-816-L) between the outboard lower
bushings as recommended per plan. With a bit of struggling, we finally got it
in. But the digital level now showed TE down by 0.2o - which is a 0.4o
correction (and in agreement with the plan's estimation). It became obvious that
I should get a washer that is 1/2 the thickness (i.e. 0.015" thick). I
found a stainless steel shim washer from McMaster-Carr which will fit the bill.
However, I decided to post the question to the Cozy forum first before diving
in.
I
received a few e-mail responses and a call from Wayne Hicks within 15 minutes...
what a support group!!! Wayne pointed out that the spar is still a bit noodly
(hence the noodly effect!!!). I believe the weight of the wings (& winglets)
caused a twisting moment at the spar, especially without the support of the
strake causing the TE up effect. Most recommendations were to hold off any
washer corrections until the strakes are built.
After
giving it some more thoughts on the above comments, I took a couple of stands
and propped up just slightly at the TE of the wing next to the winglets and
voila... I got my 0.0 degree back - no washers needed .
.
Now,
it is time for me to jump back to Chapter 19, Section 11 (Controls), to complete the torque tube
linkage between the ailerons and the control stick...
[Hindsight 09/2010] At this
point of time, I have the engine mounted onto the firewall and the upper cowling
in place (that required mounting the wings back on). I get 0.0o on
the left wing an 0.1o up on the ring wing. I may not need to add any
washer after all.
[Hindsight 08/04/2012] I have
to remove the wings for seam treatment between the wing root and center section
spar. After putting both winds back and bolted down, I got 0.0o on
the fuselage and both left and right wing. The engine is not mounted at this
time. Regardless, the wings are close to balance.
 It
is recommended that installation of the Center Section Spar should not be done
until the wings and ailerons are built and match drilled to each other. However,
it is rewarding to see a trial fit...
It
is recommended that installation of the Center Section Spar should not be done
until the wings and ailerons are built and match drilled to each other. However,
it is rewarding to see a trial fit...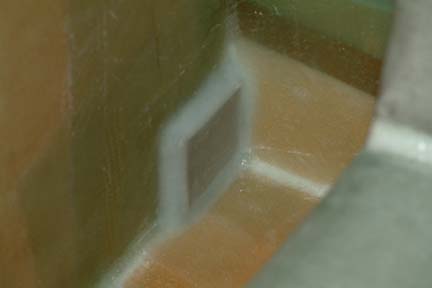 My
EM-2's are a bit larger in size than plan because my inserts at the firewall are
1.75" round discs instead of 1" x 1" squares (Chapter 4 Step 5).
I made the EM-2's out of 2024 T4 (instead of T3 because that's what I have
on hand) with the size large enough to cover the entire disc area. I rounded off
the corners and shaped its edges to fit into the fuselage corners. Per plan, I
applied flox all around the EM-2's, then I applied 1 layer of BID and peel
plied.
My
EM-2's are a bit larger in size than plan because my inserts at the firewall are
1.75" round discs instead of 1" x 1" squares (Chapter 4 Step 5).
I made the EM-2's out of 2024 T4 (instead of T3 because that's what I have
on hand) with the size large enough to cover the entire disc area. I rounded off
the corners and shaped its edges to fit into the fuselage corners. Per plan, I
applied flox all around the EM-2's, then I applied 1 layer of BID and peel
plied.  I
slid the center section spar into the fuselage opening per plan. Besides
leveling the fuselage and spar side to side and front to rear, I must check the
skew of the spar by measuring from each end of the center section spar to the tip of the
nose. However, I do not have a good center spot at the nose to measure, so I made a
simple fixture (as shown) and clamped it onto the center of F28. It consists of a
piece of scrap wood, a small screw, and a picture hanging cable. This way, I can swing
left and right while squaring out the spar to the fuselage.
I
slid the center section spar into the fuselage opening per plan. Besides
leveling the fuselage and spar side to side and front to rear, I must check the
skew of the spar by measuring from each end of the center section spar to the tip of the
nose. However, I do not have a good center spot at the nose to measure, so I made a
simple fixture (as shown) and clamped it onto the center of F28. It consists of a
piece of scrap wood, a small screw, and a picture hanging cable. This way, I can swing
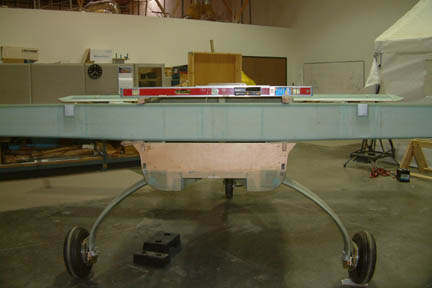
left and right while squaring out the spar to the fuselage. 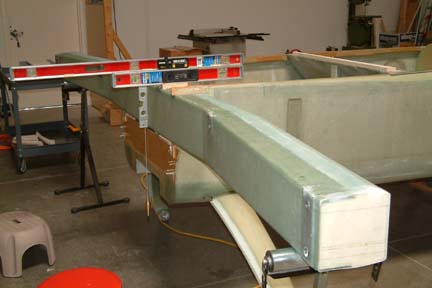 Here's
a picture showing my alignment approach. I mounted two (2) level boards on the
spar (earlier), just in case 1 breaks off. Since they were in tact, I used the
second one as a backup. I also used a plumb line to make sure the spar is lined
up to the center of the fuselage. The bubble level (that I hot glued to the aft
face of the spar) gave me a rough check on the leveling of the spar as well.
Here's
a picture showing my alignment approach. I mounted two (2) level boards on the
spar (earlier), just in case 1 breaks off. Since they were in tact, I used the
second one as a backup. I also used a plumb line to make sure the spar is lined
up to the center of the fuselage. The bubble level (that I hot glued to the aft
face of the spar) gave me a rough check on the leveling of the spar as well.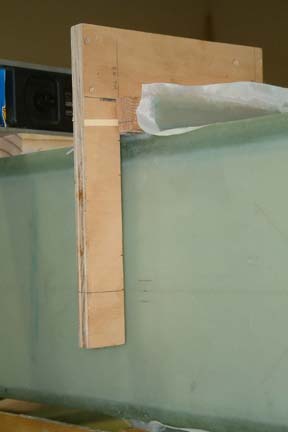 Here's
an angled board resting on top of the upper longeron (WL23). Note the horizontal line I
drew
on the vertical leg - which is 5.6" below the top of the upper longeron or WL17.4. I used it
to verify the height of my spar to be at WL17.4 exactly.
Here's
an angled board resting on top of the upper longeron (WL23). Note the horizontal line I
drew
on the vertical leg - which is 5.6" below the top of the upper longeron or WL17.4. I used it
to verify the height of my spar to be at WL17.4 exactly.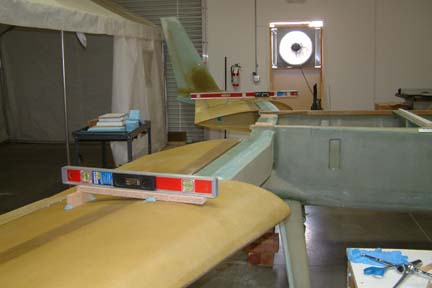 This
is one of those moments you look forward to ...after all those alignment efforts
in Chapter 19, Section 12, I balanced the main wing on a 4 wheel roller cart and
lined up the 3 mounting holes in the spar and wing. It took Susann and I quite a bit
of joggling to line up the bushings between the spar and wings. Once they lined
up, the bolts slipped through nicely.
This
is one of those moments you look forward to ...after all those alignment efforts
in Chapter 19, Section 12, I balanced the main wing on a 4 wheel roller cart and
lined up the 3 mounting holes in the spar and wing. It took Susann and I quite a bit
of joggling to line up the bushings between the spar and wings. Once they lined
up, the bolts slipped through nicely.