Per the previous chapter (Ch18_22), I have built my
canopy stop using both lock and no-lock type of gas struts. With my mounting
locations, they are interchangeable with minimum effort. However, neither one of them
will help to hold down the canopy if the canopy lock ever opens up in flight.
As a matter of fact, they will help to open it up. With the pilot strapped down during flight, it is impossible for the pilot to be
able to unlock and close the canopy with one hand, while flying the plane with
the other. I believe, that's
the cause of many canopy opening induced crashes. I do know an experienced Cozy
flyer who was able
to bring
the plane back down to safety while the canopy was in full open position![]() - I am certain I won't be able to keep my cool under those circumstances
- I am certain I won't be able to keep my cool under those circumstances![]() .
To me, it is an important safety issue that warrants serious consideration.
.
To me, it is an important safety issue that warrants serious consideration.
With the heightened awareness of these incidences, most Cozy builders, especially with side hinged canopies, paid special attention to their canopy lock designs. Unfortunately, canopy opening in flight still occurs - frequent enough to be unsettling for a low time pilot like me. If you visit the Cozy archives, there have been numerous discussions regarding a fool-proof canopy lock - with visual and voice warnings. Regardless of the design, it always requires the pilot to 'remember' to close the canopy and lock it securely. If it got jarred loose in-flight (or during your 60o banks), that's a different problem! I know, I know, some will say 'its pilot oversight', 'my lock design is fool proof', 'they did not follow their check list' or 'it won't happen to me'. Personally, I am going to assume that it could happen to me - just like the gear up landings! Per the Cozy archive, 50+% of Cozy pilots experienced gear up landings. Were they not aware of the odds? Did we (as a group) not try to come up with a fool proof design and procedures? Sure we did, but statistics show otherwise.
I think what we are missing is that, besides the canopy lock, we must find ways for the canopy to 'stay put' even if the lock jarred loose in flight. That way, we'll have a much safer system. This scenario would be similar to the front hinge canopy design - the wind actually keeps the canopy to stay in-place even if the lock does not. History showed their locks came loose as well. Unfortunately, its too much work for those of us who already built the side hinged canopies to switch over to front hinged canopies - me included.
In my view, one way to keep the side mounted canopy in place is to have an electric actuator to control the opening and closing of the canopy. The canopy will stay put wherever you put it - open, close or anywhere in between. It would be unlikely for the pilot to take off with the canopy partially open (or not closed) due to visual obstruction, increased wind noise and the increased wind speed. Therefore, if you ever close your canopy before taking off, its a good bet that your canopy will stay put because the actuator will hold it there. The function of the canopy lock, in this case, becomes secondary or complimentary. Your life is not totally dependent on the lock anymore! Is this a reasonable solution? Dunno...I am not flying yet. I will write an update on this in due time.
I decided to replace my canopy gas strut with a 12V DC linear actuator (Progressive Actuators PA-14-8-150). It has 8" travel, a lifting force of ~150lbs and a static force of 500 lbs. As always, every time you deviate from plans, you'll get a handful of engineering challenges that I'll discuss later on. With the actuator in place, I can now open and close my canopy by pushing a rocker switch - like your electric car window. If I choose to leave the canopy partially open during taxi, I can do so, because the actuator will hold the canopy in place (500lb static force). Lets assume I close the canopy but forgot to lock, the actuator is still holding the canopy in the closed position unless there is a lifting force of ~500lbs. According to the Cozy archives, the initial lifting force of the canopy (in-flight) is estimated to be ~20lbs - way below the static force of the actuator. Therefore the canopy will stay put. Obviously, I am not going to leave it to chance - without a lock? I am not that brave. The canopy lock now becomes a backup assurance.
|
|
Canopy Actuator Mounting Position (#1)
This mounting method worked OK. However, I did not like the actuator pushing horizontally from the closing position to the open position. I feel it is putting undue stress against the entire canopy frame and hinges. I decided to explore a more efficient / friendly mounting position, yet giving me the same degree (>60o) of openings. As it turns out, there are an infinite number of mounting positions, the question is where is the optimal one? |
Canopy Actuator Mounting Position (#2)
With the opening angle established, using a bit of trigonometry, one can calculate the distance of B and C from the hinge (A). The distance AB = AC = 7.5". Therefore, the extended end of my actuator anchor point (at the canopy base) is 7.5" from the hinge.
Drawing a circle of 19.75" radius (length of extended actuator) with center at B and a circle with radius of 11.75" (closed actuator) at center C, I can establish the common anchoring position for the actuator (D).
Now you can imagine the actuator base is anchored at D and its extended end at C (closed position). If I extend the actuator fully, its extended end will be at position B, with the canopy opened at 64 degrees. The path of the actuator tip actually travels from C to B along the arc of the small black circle.
[After Thought] Based on the (Position #2) mounting location, the lifting force required to raise the canopy was (roughly) calculated. The weight of my canopy (including all hardware, but no paint) is 24lbs. The width of the canopy arm is 38.5" with the center point at 19.25". Assuming the weight of the canopy is evenly distributed. Therefore, the mechanical disadvantage of the canopy lifting at (7.5" from hinge) can be calculated at 19.25"/7.5" = 2.57. The lifting force required can be calculated to be 24lb*2.57 = 61.68lb. The actuator I am using is rated at 150lbs. Therefore, I have a 2.43 lifting force margin for opening the canopy. |
Canopy Attachment Hard Point
Here's a picture showing the hard point being floxed in place. You can barely make out the 2 threaded end holes and the center hole for the quick release pin. |
Actuator Mounting Fixture at Canopy
|
Actuator Rod End Assembly
One of the most time consuming assembly for this approach is designing and proofing out the rod end assembly. It is important to note that when the canopy reaches its closing location, it may sit on top of the locking hooks (if the locks are open). That will cause an obstruction between the pulling force of the actuator and the hook (not a good situation). Therefore, a spring loaded gap must be designed into the assembly to allow the retracting actuator to continue even if the canopy runs into obstruction.
The other end of the actuator is anchored to an extended hard point I glassed onto the floor of the fuselage. It is important to note that it does get in the way of the rear passenger (if you plan to have one). For my case, the Cozy is mainly just for Susann and me. So the back seats are basically for luggage. However, this actuator control system can be changed out back to my original lock and gas strut set up in 5 minutes. |
|
The rod end assembly consists of a few simple lathe parts: - a steel tube housing. One end of the tubing has to be enlarged a bit to fit onto the actuator extended end ; - a base plug, 3/8" thick with a 10-32 threaded hold at the center; - a 1" flat spring (McMaster Carr); - an end cap plug, 3/8" thick with a 1/4" through hole for the aluminum tube to slide through; - an aluminum tube, threaded through 10-32; - a male rod end with 10-32 threads; - a couple of 10/32 short screws; and - 2 spacers (or washers). |
|
|
|
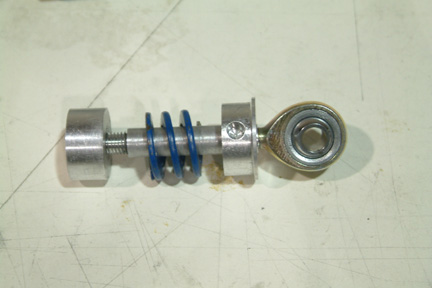
Here's the assembly all put together.
The end cap is screwed in place to the steel tubing. The base plug (inside the tube) butt against the extended end of the actuator. A quick release pin will be used to connect the actuator to the canopy frame. |
Though I can run the manual lock (installed in Ch19_18) and my new 'actuated' canopy combination as is, it is better to have them both 'actuated' as a pair. It will become clear as I discuss all the available options below. Now you can visualize the actuated pair in operation. Push 1 button to open the lock, then hold second button to open the canopy. You can release the second button at any canopy location and the canopy will stay in place until you push the up or down button.
***** Important Consideration *****
With all systems, there's always unexpected 'got ya's'. Assuming your actuator lock is in the 'lock' position. You decided to push the canopy open - that would not be good. Therefore, the canopy lock must tie to a micro switch to enable/disable the canopy actuator. In other words, when the lock actuator is in the lock position, it disables the canopy actuator. Inversely, when the lock actuator is in the open position, it will enable the canopy actuator (via a micro switch). The trigger mechanism is pretty simple - just need to make sure its sturdy and repeatable.
Actuator Lock Design
|
|
This 'thread converter' consists of 5/8" diameter tubing with two different tap holes at each end. It replaces the original plastic actuator tip and also functions as a thread converter for the remaining assembly.
The actuator for the lock is a Firgelli mini actuator L16 Series. It has a 3" stroke and ~44lb push/pull force. Its has a small physical size - which allows me to mount it at the forward side of the instrument panel. The threaded tip of the actuator is M8-1.25, thus requiring my converter.
One advantage of this actuator is that this lock actuator can be driven as low as 3.5V in the event the battery drains down during dormant periods. |
|
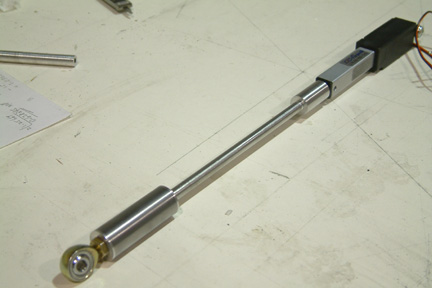
Here's the picture of the completed lock assembly. I also added a small bracket (not shown) to the front of the 'converter' to trigger a microswitch to able/disable the canopy actuator. |
|
|
|
|
The canopy actuator is triggered by an aluminum bracket (a small metal strip, bent at 45o and a hole in one end). It is sandwiched between the tip of the lock actuator arm and the thread convertor. Once the actuator is fully extended, it will make contact and close the microswitch, thus enabling the canopy actuator. Just that simple. Conversely, as the lock actuator pulls back, closing the lock and away from the microswitch, thus disabling the canopy actuator.
Remote Control
|
You can see my dual actuator control canopy in action at http://www.youtube.com/watch?v=Zh_cn8hvd-Y
So far, the system performs well as planned.
I was able to make good use of it when I was working on shaping the upper
fairings (at the passenger side). I can observe the seam while operating the
canopy remotely![]() - many many times.
- many many times.
[Hindsight] I am now
at Chapter 22 (Electrical). I wired up the control system to a toggle switch,
that gives me the option to activate the actuators via direct wiring (inside the
plane) or remotely (with the remote pendent). Just an added feature to prevent
me from butt dialing the actuators in flight![]() .
.
OK. A lot of people are going to wonder what I am thinking - going with such an unusual approach! Well, I have to admit that I thought about it a lot throughout the entire designing and building process...I have already discussed why I wanted to have a dual actuator controlled canopy (above). Remember, this modification did not render the Plans gas strut approach inoperative. I can switch back to the original approach in about 10 minutes. Regardless, here's some other questions (from myself and other Cozy builders) and answers to this new modification:
| How are you going to open or close the canopy? | The canopy lock and lift are operated by 2 different actuators. They are both controlled by the 4-channel remote control unit (shown above). Push the lock (open) button to unlock and raise the canopy off the locking hook. Then push the lift canopy (open) button to open the canopy. Similarly there are close buttons for both. |
| Where do you store the remote control? | You can add (and program) as many remote controls as needed. I will mount one on the IP by the control stick, one I carry with me and one for Susann (as a backup). |
| Are they a 'one push' or 'continuous hold' buttons? | Both actuators can be set (individually) for one push or continuous. I set them both on continuous because that prevents any accidental bump on either buttons. Therefore to unlock and/or open the canopy, I have to be engaging the actuators INTENTIONALLY. |
| How do you lock up the plane? | The canopy will be held down (locked) by both the lock actuator and lift actuator. |
| What is going to remind me to close the canopy before rotation? | Check list and wind in your face. |
| What is going to remind me to lock the canopy before rotation? | Check list and wind in your face. When the lock actuator is open, the canopy will be resting right at the top of the locking hook - held down by the lift actuator. |
| What happens if I push the lift actuator button accidentally in flight? | Nothing. The canopy lift actuator will be disabled, once the lock actuator is closed. |
| What happens if I push the lock actuator button accidentally in flight? | Not much, the lock MAY rotate a little bit, but not enough to unlock. There is a 1 1/2" actuator travel to unlock, in addition, the actuator has a 'dead' travel of 1/2" before engaging the lock. Even if it is fully unlocked, the canopy actuator is still in the closed position - holding the canopy down (@500 lbs static force). The air leaking through the slight crack should certainly get your attention. Just push the lock close button. |
| How are you going to get out if the battery runs out of juice while you are in the plane? | If I am inside the plane, both actuators can be disengaged by pulling respective quick release pins. Then the lock and canopy will swing freely. |
| What happens if the battery is dead while you are outside the plane? | I will have a charging port for the battery
from outside the plane. Most likely at the firewall as many Cozy
builders have. Then sit and wait |
| In the event of an accident (right side up) or power out situation, how are you going to get out? | Remove 2 quick release pins. However, if I am incapacitated, I'll be in the same situation as the gas strut arrangement. From very reliable sources, the rescue personnel are not going to take time to figure out how to open our canopy carefully. They will be using the 'international key' nicknamed AXE! |
| In the event of an accident and you are upside down, how are you going to get out? | Basically, I'll be in the same situation as the gas strut arrangement. However, if I can reach the IP by the control stick, I can engage both actuators with a push of a button. Not much maneuvering room required. I suspect the lift actuator may just wedge the canopy and fuselage apart for me to get out. Do you think 150 lbs lifting force will be enough? Hopefully I do not have to find out the hard way. |
| Any comments shall be appreciated | see below! |
Since I posted my write up on this Dual Actuator Canopy Control, I received several great comments and questions from other Cozy builders and flyers. They are listed as follows:
| Don't forget that there is a mechanical advantage between the lifting force at the lock vs. the holding force at the lifting actuator | Good point! The distance between the lock and the hinge is 38.5". The distance between the lift attachment to the hinge is 7.5". To overcome the #500 actuator static holding force, my lifting force at the lock can be calculated to be [#500*7.5/38.5] = #97. The general consensus on that lifting force ~#20. |
| In the flip over case, what kind of pushing force can be expected? | Considering the mechanical advantage, I took
the mid-point of the canopy for the calculation. The mid-point of the
canopy is about 19.25" and the lift actuator is at 7.5" from hinge. The
mechanical disadvantage is 19.25/7.5 = 2.57. Since now, I only have #150
lifting force and with the 2.57 mechanical disadvantage, the lifting
force comes to #150/2.57 = #58. Not much! Though it will be better than
my gas strut but certainly not enough to save the day, unless you change
out for a stronger actuator. As it was pointed out to me, its time to
use the AXE |
| The canopy latches provide structural integrity to the canopy in the event of a crash. The three points on the left side of the canopy act like the hinges on the right side of the canopy. The actuator lift alone provides no structural attachment to the left side of the canopy. Therefore, your life is still dependent on those three canopy latches. | Certainly, the canopy lift actuator is not there to replace the canopy latches. Hence we have a second actuator to manage the lock/latches as well. So don't leave home without them! |
 Here's a picture of my actuator controlled
canopy. With its mounting position (Position#2, discussed later), actually, it offers less obstruction to the pilot or
passenger in entry or exit of the plane, compared to the gas struts. Note that
this is the second mounting position as discussed below.
Here's a picture of my actuator controlled
canopy. With its mounting position (Position#2, discussed later), actually, it offers less obstruction to the pilot or
passenger in entry or exit of the plane, compared to the gas struts. Note that
this is the second mounting position as discussed below.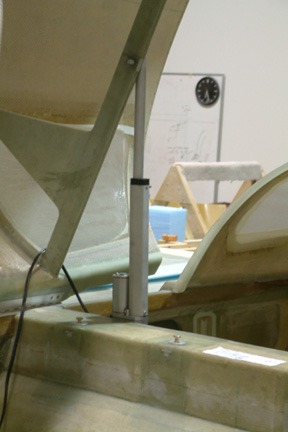 I
was able to use the existing (gas strut) anchoring hard point for the electric
actuator. The only difference is the mounting location at the extended end. I
made a temporary mounting hard point and tested it out. Here's a picture of the
electric actuator using the existing gas strut anchoring points. When I extract
the actuator to its fully closed position, the actuator will be in the
horizontal position - same as the gas strut position (Refer to previous
chapter).
I
was able to use the existing (gas strut) anchoring hard point for the electric
actuator. The only difference is the mounting location at the extended end. I
made a temporary mounting hard point and tested it out. Here's a picture of the
electric actuator using the existing gas strut anchoring points. When I extract
the actuator to its fully closed position, the actuator will be in the
horizontal position - same as the gas strut position (Refer to previous
chapter). 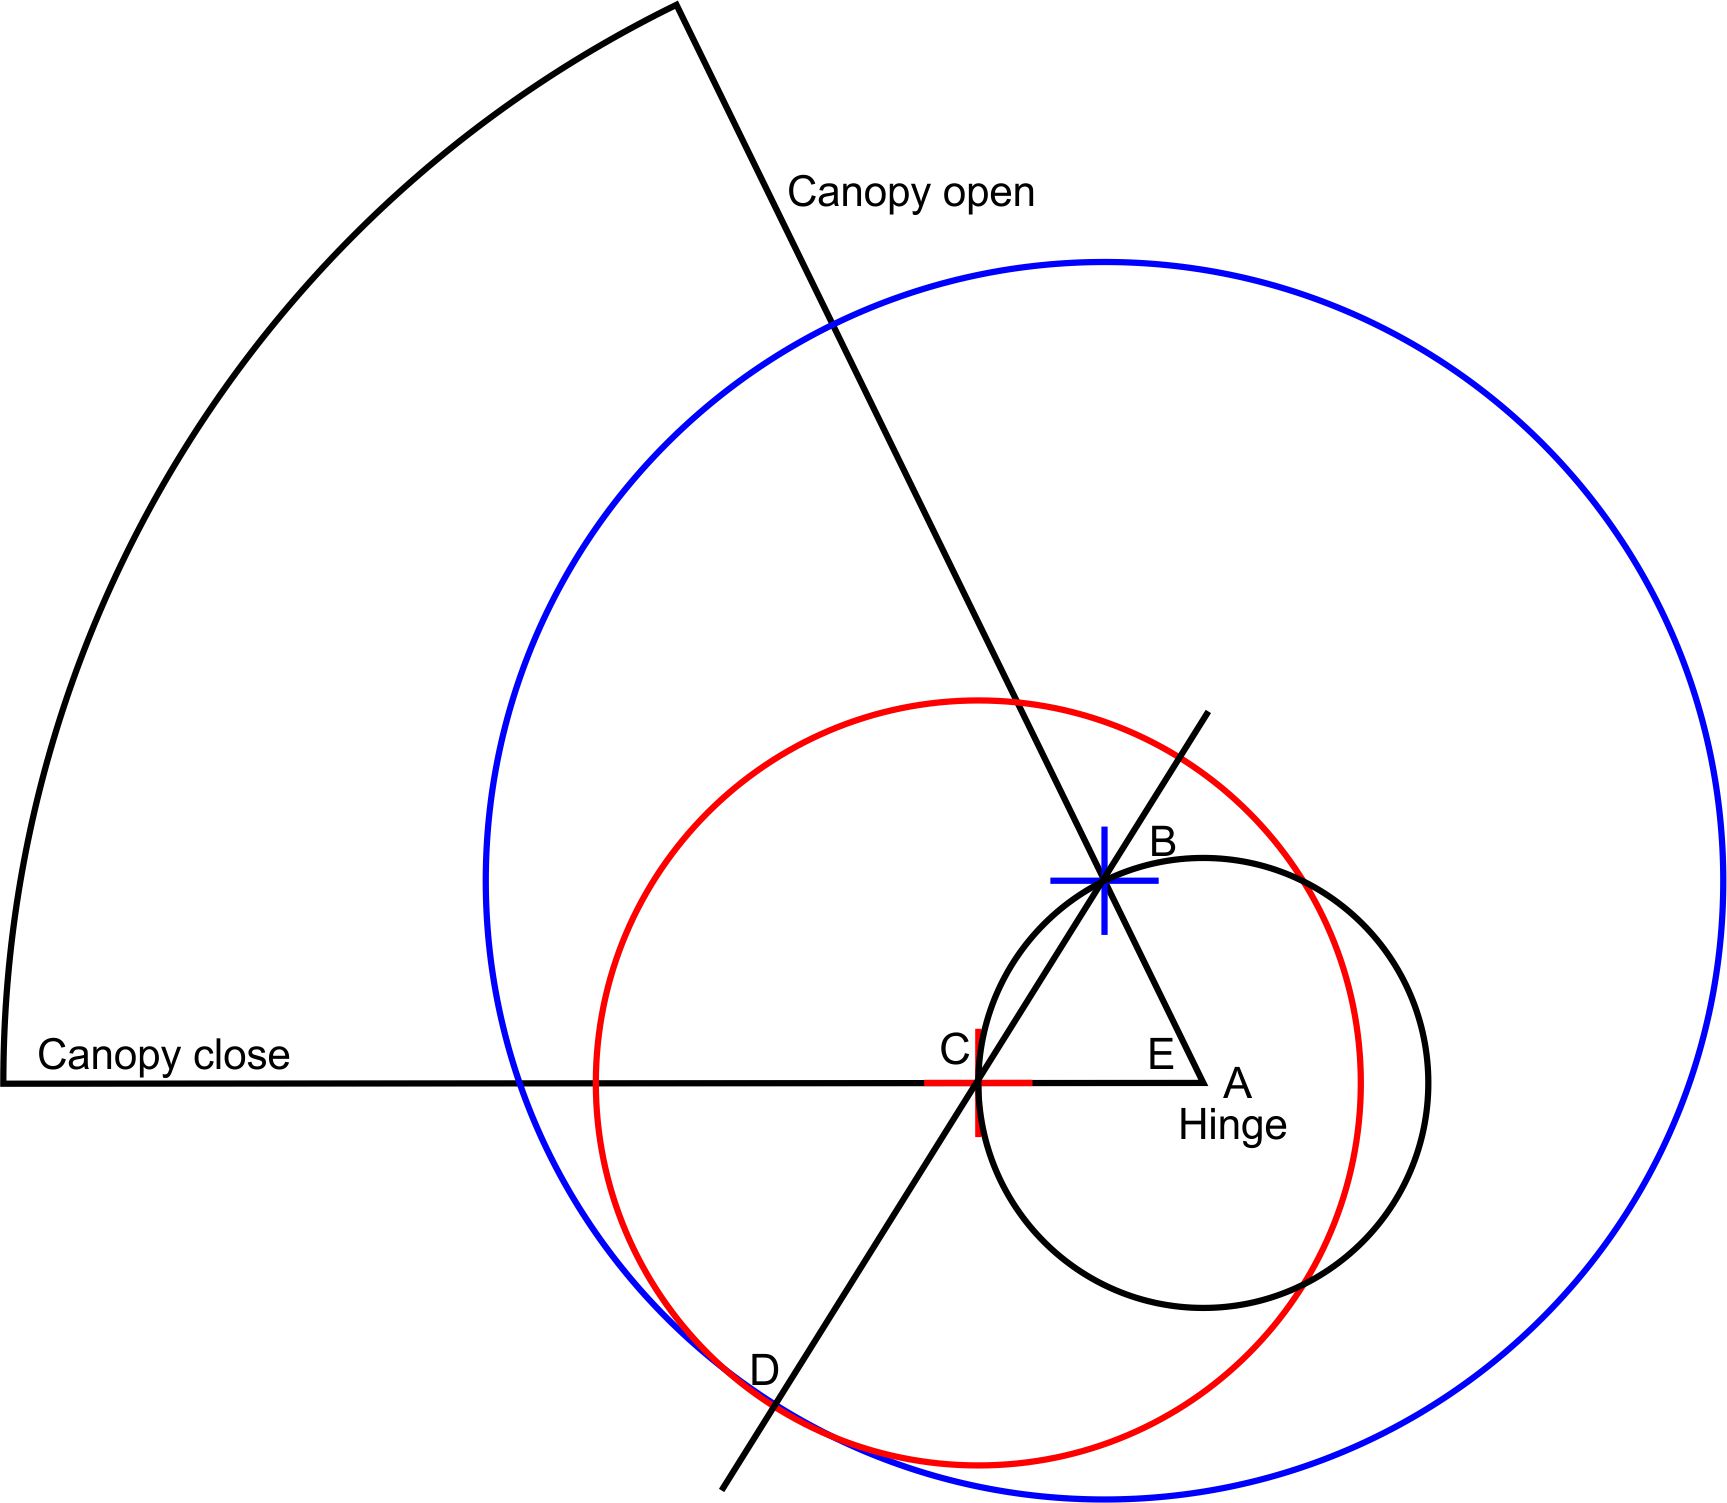 Since I have an 8" travel actuator, the attachment point at the canopy
must have travel 8" from fully open to fully close position. Using my graphics
program, I first establish the desirable canopy opening and closing positions -
indicated by the large black arc. Point A is the hinge position and angle E is 64
degrees as I have established in my previous installations. Therefore, the
distance between B and C is 8" (i.e. the fully extended position of the actuator
(B) and the fully closed actuator (C)).
Since I have an 8" travel actuator, the attachment point at the canopy
must have travel 8" from fully open to fully close position. Using my graphics
program, I first establish the desirable canopy opening and closing positions -
indicated by the large black arc. Point A is the hinge position and angle E is 64
degrees as I have established in my previous installations. Therefore, the
distance between B and C is 8" (i.e. the fully extended position of the actuator
(B) and the fully closed actuator (C)).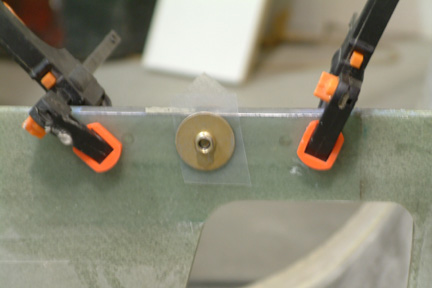 Since
I will be raising the canopy relatively close to the hinge (i.e. 7.5"), I expect
quite a bit of force will be exerted at the attachment hard point. I decided to embed a
hefty hard point for the occasion. The hard point is made out of 4"x1"x3/8" aluminum plate with
3 holes, evenly spaced. The two end holes are threaded for 1/4x28 bolts and
the center through hole is for a 1/4" quick release pin. The pin allows quick
disengagement of the canopy from the actuator.
Since
I will be raising the canopy relatively close to the hinge (i.e. 7.5"), I expect
quite a bit of force will be exerted at the attachment hard point. I decided to embed a
hefty hard point for the occasion. The hard point is made out of 4"x1"x3/8" aluminum plate with
3 holes, evenly spaced. The two end holes are threaded for 1/4x28 bolts and
the center through hole is for a 1/4" quick release pin. The pin allows quick
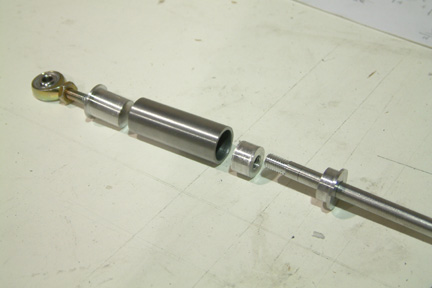
disengagement of the canopy from the actuator. The
extended end of the actuator is mounted in this fixture, which in turn, is mounted
to the canopy attachment hard point (above). The mounting fixture is attached
with (2) 1/4x28 bolts at the threaded holes. The center is a through hole for a
quick release pin. The release pin allows the canopy to be disengaged from the
actuator quickly for whatever reason.
The
extended end of the actuator is mounted in this fixture, which in turn, is mounted
to the canopy attachment hard point (above). The mounting fixture is attached
with (2) 1/4x28 bolts at the threaded holes. The center is a through hole for a
quick release pin. The release pin allows the canopy to be disengaged from the
actuator quickly for whatever reason.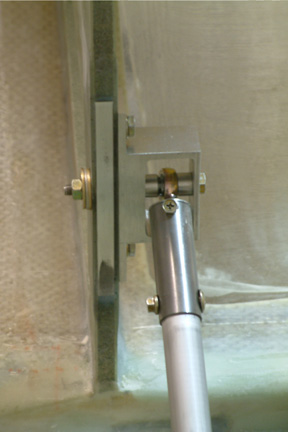
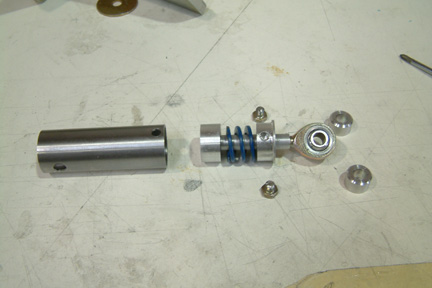
 Here's
a picture showing all the components for the rod end assembly. Notice the 10-32
threaded rod connecting the base plug to the aluminum? The male rod end screws
into the outer end of the aluminum tubing. The length if the tubing is just long
enough for both the threaded rod and the rod end screw.
Here's
a picture showing all the components for the rod end assembly. Notice the 10-32
threaded rod connecting the base plug to the aluminum? The male rod end screws
into the outer end of the aluminum tubing. The length if the tubing is just long
enough for both the threaded rod and the rod end screw.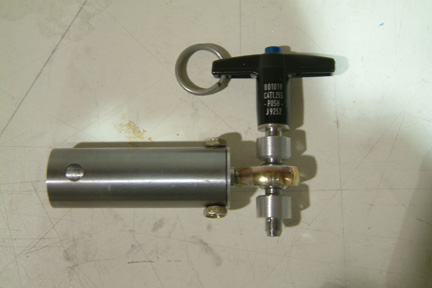
 The
actuator lock consists of a few small parts as shown. The rod end is attached to
the Plan's lock assembly. The middle section consists of a steel tube housing, 2
end plugs and a center disk. This small assembly is designed to accommodate
the variance between the actuator travel vs. the lock hook travel (~0.5"). As the
actuator pushes forward, it moves the center disk ~.5" (inside the steel tubing)
before making contact against the rod end plug - which in turn, opens the
canopy lock. The same occurs in reverse when the actuator retracts and pulls the
canopy lock in place.
The
actuator lock consists of a few small parts as shown. The rod end is attached to
the Plan's lock assembly. The middle section consists of a steel tube housing, 2
end plugs and a center disk. This small assembly is designed to accommodate
the variance between the actuator travel vs. the lock hook travel (~0.5"). As the
actuator pushes forward, it moves the center disk ~.5" (inside the steel tubing)
before making contact against the rod end plug - which in turn, opens the
canopy lock. The same occurs in reverse when the actuator retracts and pulls the
canopy lock in place. 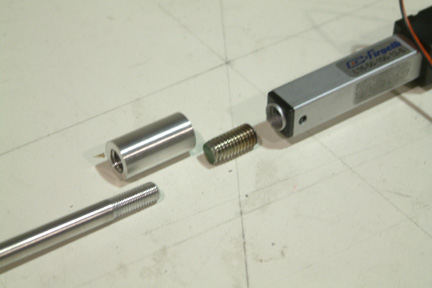
 This
is how the rod end attaches to the
Plan's lock hook.
This
is how the rod end attaches to the
Plan's lock hook. 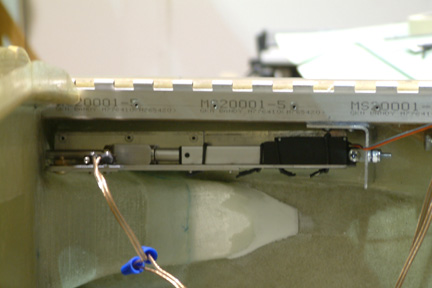 This is how
I mounted the lock actuator forward of the
Instrument Panel. If you look close, you can see a small bracket (discussed
below) to enable/disable the canopy actuator. A microswitch is also attached
(note the wires). When the actuator is fully extended, it will push at the
bottom of the canopy lock hook to open. At the same time the bracket will engage
the microswitch, enabling the canopy actuator. The routing of the wire will be
cleaned up during the electrical phase.
This is how
I mounted the lock actuator forward of the
Instrument Panel. If you look close, you can see a small bracket (discussed
below) to enable/disable the canopy actuator. A microswitch is also attached
(note the wires). When the actuator is fully extended, it will push at the
bottom of the canopy lock hook to open. At the same time the bracket will engage
the microswitch, enabling the canopy actuator. The routing of the wire will be
cleaned up during the electrical phase.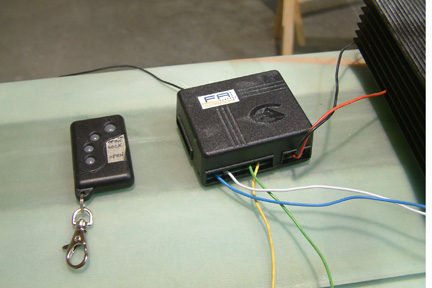 At this point, I am sure you'll be wondering how I am able
to open and close the actuators if I am outside the plane? Well, Firgelli
sells a 4-channel wireless actuator control for $65 (Model 4CH-RC). Rated for
10 amps per channel. It is very simple to set up and hook up. With the remote
control, I can unlock and open the canopy (or reverse) remotely. Actually I
tested its range to more than 50 feet. Once the canopy is closed and locked, it
will be held down by both actuators as a dual lock system - believe me, when the
canopy is closed, it's closed. I have been running both actuators with a 12V
2.5A power supply and the remote control with no problem. I expect this will be
tested many times throughout the rest of my building journey.
At this point, I am sure you'll be wondering how I am able
to open and close the actuators if I am outside the plane? Well, Firgelli
sells a 4-channel wireless actuator control for $65 (Model 4CH-RC). Rated for
10 amps per channel. It is very simple to set up and hook up. With the remote
control, I can unlock and open the canopy (or reverse) remotely. Actually I
tested its range to more than 50 feet. Once the canopy is closed and locked, it
will be held down by both actuators as a dual lock system - believe me, when the
canopy is closed, it's closed. I have been running both actuators with a 12V
2.5A power supply and the remote control with no problem. I expect this will be
tested many times throughout the rest of my building journey.