Chapter 27 - Section 5
Phase 1 Testing Experience
After going
through the DAR inspection and First Flight (by my test pilot), we all naturally
assume Phase 1 testing shall commence. I have gathered (and read) many Phase 1
test plans and started my customized Phase 1 test plan as well. The day of
reckoning arrives when you start thinking about climbing into your plane that was
flown only once by a VERY experienced pilot. I am going to take it up next...???
First of all, I am a low-time pilot, and I have not kept
up with flying for the past 12 years (i.e. throughout my building years).
Technically, I am not even legal to fly because I allowed my biannual to lapse. I did, however, plan ahead to get my medical
certificate. Then I signed up with a
local flight school to brush up on my ground school knowledge and flying.
It took me close to 15 hours, flying a Cherokee, to get my biannual signed off
as well as familiarize myself with various procedures here at the Chino Airport. After
many more hours of flying accompanied by a competent canard flyer, I learned to
transition from a Cherokee to a Cozy... A Cozy is certainly a very different
flying machine! I have to shed a few 'bad' habits accustomed to flying a
Cherokee in this transition period.
Phase 1 Sand Box
Once my Cozy was considered 'air worthy' by the DAR
inspector, I was assigned a 12-mile square Phase 1 test area. Since my home base
airport (Chino Airport KCNO) is in the midst of the Los Angeles basin, my assigned
Phase 1 Test Area (sand box) has to be clear from congested areas. In my case,
my sand box is 50 miles from the Chino Airport. It sounds a bit illogical that I
have to fly 50 miles to play in a 12 mile square sand box. Regardless, I
followed the assigned rules and performed almost all my climb, descend, stalls
etc. inside my sand box.
The second unexpected diversion, as I soon found out
during Phase 1 testing is that - fixes and refinements need to be done to the
plane, and re-test before moving forward. Subsequently, my Phase 1 test phase is more like a stop and go process. Here's a
few of my work in process fixes...
|
Yaw Left
 One of the first things to look for during the early stage
of Phase 1 testing (besides if this airplane flies) is if this airplane flies straight
and level. Well, the ball in my slip & turn indicator was slightly off. The
right edge of the ball just barely touches the right side of its enclosing
box. So a small (a 1 1/2" x 1/16" stir stick) was added (floxed) onto the
right rudder hard stop. That kept the ball centered. Surprisingly, I now noticed that many
Cozies have the same issue. One of the first things to look for during the early stage
of Phase 1 testing (besides if this airplane flies) is if this airplane flies straight
and level. Well, the ball in my slip & turn indicator was slightly off. The
right edge of the ball just barely touches the right side of its enclosing
box. So a small (a 1 1/2" x 1/16" stir stick) was added (floxed) onto the
right rudder hard stop. That kept the ball centered. Surprisingly, I now noticed that many
Cozies have the same issue.
I also verified the yawing of my plane by taping a yarn on
the center of my canopy (picture left). Once I added the stir stick, the yawn
stayed centered on my subsequent flights.
|
Roll Right Tendency
After several flights, I noticed my plane has a tendency
to roll to the right. Since I have Bill (my test pilot) with me (he is ~60lbs
heavier than I am), it was suggested to me that I should wait before making any
changes / refinement to the plane. Since I have a positional feedback trim
actuator, I can see my trim position on my EFIS. I was surprised to see that my
trim correction was quite large. After much checking, I learned that I should
set the mid-point of my actuator at aileron neutral position INSTEAD of
mid-point of up-most and bottom-most travel. That seemed to make it look much
better on screen.
After flying many more hours solo, my plane continue to
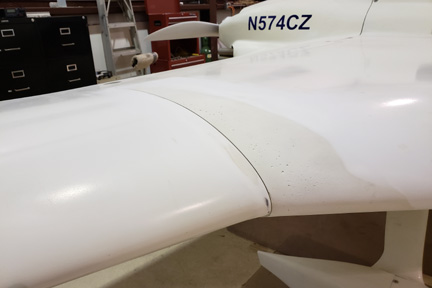
have roll right tendency. I decided to add 1/2 thickness washer to the top two right wing bolts and
1/2 thickness washer to the bottom left wing bolt. Since then (half way into my Phase 1 testing),
my plane can be easily trimmed straight & level (hands off) with ease. As
expected, addition of the two washers
leaves a noticeable seam mismatch between the leading edge of both wings and the
main spars. I flew with that configuration
till I reached 150 flight hours - just to be sure of the leveling
characteristics. This mismatch affects both the top and the bottom seams of the
wings and the strakes.
 |
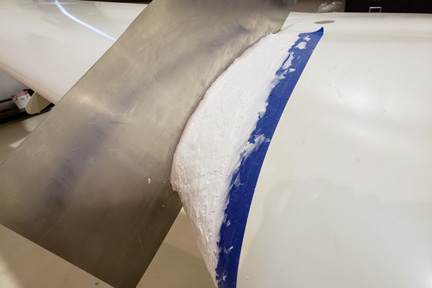
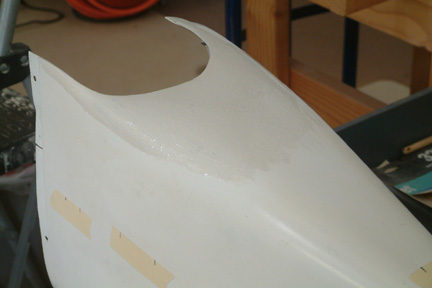
Pic1 - One of my seam matching approach is to apply turtle wax onto one
surface of a thin aluminum sheet, then wedge the sheet into the seam (as shown).
Then I applied micro onto the lower side of the seam and allowed to cure.
Once cured, I just popped off the aluminum sheet and start sanding as I have
done in Chapter 25. |
|
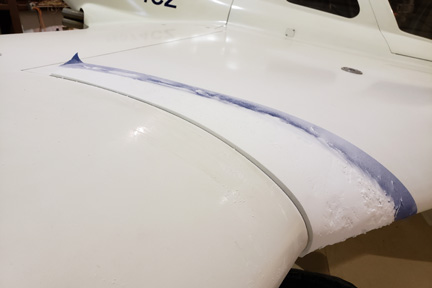
Pic 2 - As you can see, I was overdoing it with micro.
None-the-less, its rather easy to sand off. |
|
Pic 3 & 4 - I then applied primer - this time with a brush because I
was in a hangar and I certainly did not want to have any over spray around other
aircraft. It turned out reasonably well. I flew the Cozy more hours to make
sure the cosmetic changes did not produce any unexpected change to the leveling
of the Cozy. |
|
All is well. Here's
the end result of the seam...its matching up again . .
|
Battery Running Down Frequently
Early on my Test Phase 1, I experienced low battery level
that keeps me from starting the plane. My first thought was that I had this
battery (Odyssey 680) for several years while it sat throughout my electrical
and electronic installation process. The battery was never 'topped off'
periodically as I should have. Therefore, it lost its holding power.
My second guess was that I have not figured out the best
'setting' for starting my plane at that time, thus the extra cranking just sucked
up all the juice out of the 'already weak' battery. I finally went and bought a new
Odyssey 680 and an appropriate charger (from Odyssey). It was better,
but the battery level still seems low if I do not 'top it off' every week or so.
In parallel, I charged up the old battery and monitored its
discharging rate. To my surprise, the old battery was holding its juice for an
extended period with nothing hooked up to it. I concluded that something in the
plane is draining my battery...
I finally realized that my remote control for my canopy lock & push up actuators are connected to the
un-switched side of the battery. The remote control (key fob) has to be powered on (ready
mode) at
all times, thus slowly draining my battery. I added a push button switch (accessible but hidden from outside
the plane) to disable the remote. Problem solved! My battery is healthy again.
[Hindsight] Once I
figured out a procedure to start my engine (Ref Chapter 27, Section 06), it generally starts within
a couple
prop rotations. That eliminated much of the battery drain as experienced
in the past. In addition, the "hidden" remote disconnect to the remote control
proved to be correct. My battery hardly needs any recharging between flights throughout the rest
of my Phase 1 period and beyond.
Stuck Mic
On my third or fourth flight, I was experiencing a stuck mic phenomenon. When I released my PTT button, the mic stayed on the transmit
mode for another 20 seconds before it released. Obviously, the control tower did
not appreciate it, besides, it was embarrassing. So, I have to ground the
plane until it is fixed. It only occurs on the pilot side
and not the co-pilot side. That sounds like an easy fix, so I thought... Since it
only occurs on my side, that could only be caused by the grounding on my mic
plug or stuck PTT button on my control stick. Turned out to be none of the above.
Took a lot of effort to narrow it down to my PS Engineering radio control
panel unit. Borrowed Clark Canedy's PS8000 unit and made a swap - problem
disappeared. Returned my unit to PS Engineering and was repaired (they replaced
4 components) and shipped it back out after 2 hours from arriving at their shop. My guess
is that they were aware of the problem .
Regardless, this
problem stopped my Phase 1 for an extended period.
.
Regardless, this
problem stopped my Phase 1 for an extended period.
Erratic Fuel Pressure
After approximately ~25 Tach hours on my engine, I noticed
my fuel pressure (with mechanical fuel pump on only) dropped from 27 psi to
21/22 psi from time to time. After a while, the fuel pressure will climb back up
to 26/27 psi. This phenomenon is a bit unsettling especially in-flight. Turning
on my electric fuel pump will push the fuel pressure back up to acceptable level
(25-31 psi range). I know some Cozy fliers leave their electric fuel pumps on
throughout their flights. I prefer to leave my electric fuel pump as a backup
and use it for take off and landing only. That way, I'll know my mechanical fuel
pump is functioning accordingly at all times.
I was puzzled as to what may be the cause? Failing mechanical
fuel pump? Vapor lock as suggested by someone in the Vans Aircraft Forum? Or is
it just normal? Should our fuel pressure number be solid throughout? The general
consensus is that if my fuel pressure stays above 20 psi, I should be ok.
However, a drop in fuel pressure in flight is rather unsettling (for me anyway).
I know some will say – just replace it. However, inquisitive minds would like to
learn if otherwise…
Just for reference, I have an IO-320 Lycoming with 10:1
compression ratio, one Lightspeed Plasma 3 CDI electronic ignition and one Slick
magneto (P/N 4371). My mechanical fuel pump is an overhauled LW-5473. My
electrical fuel pump is Airflow Performance Boost Pump (P/N 3090050) with fuel
filter (P/N 1090079). My fuel pressure sensor is VDO 360-003 (80 psi)
connected to GRT EIS 4000. Settings at the EIS are AuxSF = 91 and AuxOFF = 15
per their installation instructions.
The first thing I checked was my fuel filter inside my
electric pump – it was clean. Then I checked the insert orifice in the fuel
pressure sensor line, it was clean and not clogged. I checked my electrical wiring – they
were secured and the body of the VDO is well grounded. I also checked the torque
values (30 in-lbs) on the spring lock ring at the bottom of the mechanical fuel
pump per Textron/Lycoming’s SB#525A. I reviewed my flight data (recorded via my
GRT EFIS) and cannot find any correlation between the FP declining trend to the
RPM, altitude, MP and CHT.
Out of ideas, I finally decided to replace the VDO unit
with a Grand Rapids Stainless Pressure Probe Part # 11-09545. So far, my fuel
pressure on the ground and in flight has been more stable. Its reporting
consistently between 24 to 25 psi. I consider the problem solved... time will
tell.
[Hind Sight] It was a
good decision to change out to the new Fuel Pressure Probe. Evidently, Grand
Rapids received many complaints and returns on the original fuel pressure probes
they sent out as part of their EIS kits..
Learning to Use EFIS
I installed a dual GRT Hx EFIS in my instrument panel. It
has lots of display functions. It took me many hours just to figure out how it
communicate with the rest of the instruments with the appropriate baud rates
etc. Once connected, I have to set what, how and when these information are
displayed. When it was all working - I got information overload. While learning
to fly the plane, all the information displayed on the EFIS became a
distraction. I decided to turn off all the 'goodies' except the basic essentials.
I flew my Cozy for a good 15 hours before turning some of the 'eye
candies' back on.
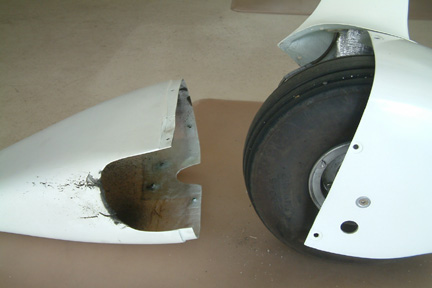
Wheel Pants Caught by Wheel?
You can find many discussions on wheel pants getting
caught by the wheel on landing in the Cozy Forum. On one of my landings -
probably in the 30's, I heard weird noises as I applied my brakes on landing. No
yaw or drag on the plane as I taxi back to the hanger. Initially, I thought a
bolt may have gotten loose - bouncing inside the wheel pants.
The next day, I decided to remove my wheel pants to check
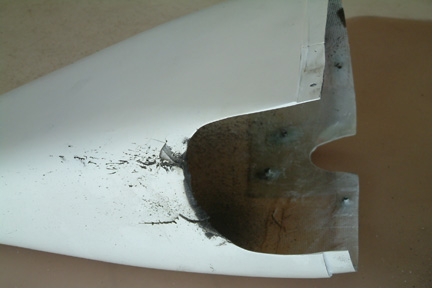
out my brakes. It looks like the my right main caught the rear edge of my wheel
pant opening (Pic #1). and ripped a piece of the glass backwards (Pic #2).
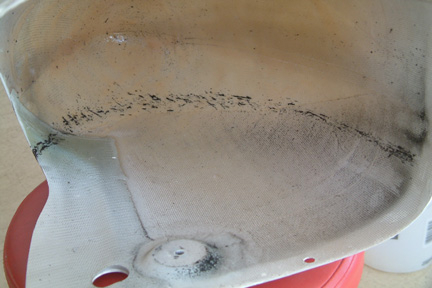
In that few seconds of contact between the glass and the wheel, it melted some of
the surface rubber on the wheel, splattered the 'tar' like material all over the
inside of the wheel pants (Pic #3). I used Simple Green cleaner to remove the 'tar' like
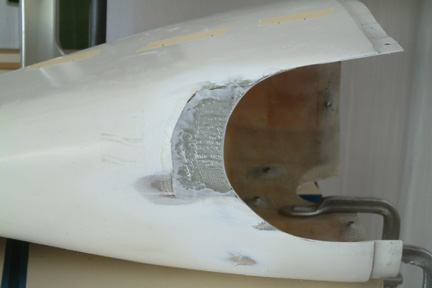
substance, all is well. Then I trimmed off the ripped fiberglass and patched it
back up with 6 layers of criss-cross UNI (because I ran out of BID), (Pic
#4). Floxed in the edges and peel plied (Pic #3). After cure, I brushed on my
primer (Pic #5) and all is well again. I also cut back the opening by ~1/4"
(towards the back). I have made approximately 10 landings since the repair,
so far so good.
[After Thought] I
showed my wheel pant destruction to a few experienced Cozy/Long EZ flyers. We
are all surprised why it occurs after so many landings - it was not a bad
landing. Some suggested that the wheel may have picked up a rock on landing and
flung the rock up, hitting the bottom of the wheel pant. The ripped glass strip
in turn swung upwards, making contact with the tire. All in all, it was a new
experience for me.
EGT Temperature Probe Jitters
After multiple flights (approximately 35 hours), my #1 EGT
temperature probes started to report erratic temperatures in flight. It jumps
between 200 to 1200oF every other second. From past flight
experience, I know my #1 EGT is always the lowest - thus NO panic! My suspicion
is that a crimp connection has come loose. After landing, I removed my cowlings
and traced through my #1 EGT electrical connections (I am glad I labeled all my
wires...) - sure enough, my crimp wire came right out. I am certain that I
performed a pull test on every crimp connection, how it ever got loose is a
mystery to me. Lesson learned - never underestimate what vibration can do to
your joining materials (such as bolts, nuts, electrical connections etc.).
Re-crimp and re-test fixed the problem...for now.
Excessive RPM drop with Electronic Ignition
As a standard procedure, we all perform an engine run up
before each flight by switching and turning off the electronic ignition and the
magneto (for my installation) alternatively and observe their respective RPM
drop. On one occasion, my electronic ignition dropped 230 RPM during my Mag check (both with mixture full or leaned). I decided to abort the
flight and return to the hangar for further investigation. Unfortunately, this
phenomena was not repeatable.
Since then, this occurs once in a while during run up and I
have aborted several flights due to this phenomena. What if this occurs in
flight? I decided to ground the plane and spent months going through the
troubleshooting guidelines per Light Speed manual. I replaced the spark plugs,
spark plug wires, re-made a new set of primary ignition wires, replaced ignition
coils, replaced manifold tygon tubing etc. - all with no success. I finally gave
up and gathered all my documentation/test data and sent them to Light
Speed (Mr. Klaus) in a long e-mail. Then I removed my Light Speed unit and paid Klaus a visit at his home
base (Santa Paula). I was greeted with a warm welcome. He opened up my unit at his shop right
away and performed a series of functional tests on my unit at his work bench. Did not take
long for him to find the problem - the female BNC connector receptacle (for
Channel A) was wedged open/loose, thus making intermittent
contact with the male pin (mating BNC connector) from the primary ignition wire. He quickly replaced the female BNC
connector in the unit and I was good to go again! Simple fix but extremely
difficult to find for sure. This set me back 3-4 months of Phase 1 effort.
High Manifold Pressure at Idle
With my engine running reasonably consistent again, I
returned to my Phase 1 testing effort. Some point in time, it was pointed out to
me that my manifold pressure at idle is running a bit high. My manifold pressure
normally runs around 13-14 psi. Normally, it supposed to be around 10-12 psi.
Several A&P agreed and all pointed out to me that I must have a manifold leak
somewhere in my system. It also translates to poorer engine performance because
Light Speed firing timing depends mostly on MP and lesser degree on RPM etc.
Subsequently, I spent months again to chase down my
"manifold leak". I tried the soap & bubble method (multiple times),
starter fluid method, smoke
methods, re-tightened all clamps with no success. Looked up the Cozy archives and
Vans Aircraft forums. Found a few builders faced the same problem, yet no one
was able to find their leak. I finally decided to continue with my Phase 1
testing and worry about my performance later on...
[Hind Sight] After I
completed my Phase 1 testing program and collected many performance data (100
hours of flight time), I am not sure my low manifold pressure (at idle) is
really that significant after all. Maybe some day I'll learn about it!
|
Brake Chatters
 Ever
since my first flight, I always get brake chatters when I applied my brakes on
landings. It was difficult to tell which brake is doing the chatter. Most
builders suggested that its probably my new brakes - just give it time... Ever
since my first flight, I always get brake chatters when I applied my brakes on
landings. It was difficult to tell which brake is doing the chatter. Most
builders suggested that its probably my new brakes - just give it time...
OK, now that I got 60 hours and 150 landings - the chatter
still there! Time to balance the tires. I borrowed a static tire balance kit
from Tom Kennedy. Armed with 1/4" diameter lead rods, I balanced both main tires
(and they were definitely out of balance). While I'm at it, I may as well
balance the nose wheel as well...
Took the nose wheel off, balanced it by adding the
appropriate lead wires. While re-assembling the nose wheel, I noticed as much as
I tightened the axle bolt and nut, the roller bearings continue to spin with the
wheel. WAIT A MINUTE! The nose wheel raceway is not (resting) spinning on the
roller bearings. Instead, the MKNG-1 bushings were too long (butting against
each other) that prevented me from applying adequate pressure to the roller
bearings against the raceway of the wheel assembly - thus generating the wheel
chatter condition. (Reference Chapter 13, page 12). I took the MKNG-1 out and
turned them down by 0.10" on both sides, reassembled them. All is well, no more
chatters. They weren't from the main wheels after all!
|
Oil Temperature Jitters
Some time during my Phase 1 Test, my oil temperature
reports jumps around a lot. My past experience has shown that my oil temperature
has always been a bit low. Normally under 180oF. Therefore, I was not
too worried. Regardless, I have to spend some $ and effort to replace the oil
temperature sensor. It was a pain to remove and safety wire it back again,
especially after the engine is already mounted on the plane.
Fuel Pressure Drops
I believe I have sensor component fails more than any Cozy
builders. Again, during my Phase 1 Testing (when the electric fuel pump is off) I
get fuel pressure alerts (below 20 psi) from time to time. Flip on the electric fuel pump and
all is well again. However, since my electric fuel pump is my backup system, it
would be unwise to rely on it all the time. Time to replace the mechanical fuel
pump. It was a pricey component, but the replacement effort was relatively
simple (if you follow the directions carefully).
[Hind Sight] The new
mechanical fuel pump worked well - above 25 psi consistently
(100 hours so far).
Push Rod Replacement
I have no idea what a push rod looks like, let alone the
functions of a push rod. During my months-long pursuit of manifold pressure
leaks, it was suggested that an excessive long push rod MAY cause the exhaust
and/or intake valves not close completely - resulting in high manifold pressure.
Since I was replacing the gasket on my #3 intake pipes, Bill Ortel decided to
inspect the length of my #3 push rods. Since I was going to replace the seals of
my cylinder covers at the same time, it would be a good time to do so.
Upon removing the #3 push rod, it was found to be a bit
too long. So I decided to check all push rod lengths. Fortunately, only #3 push
rod was too long. The rest were OK. If you are ever in the unfortunate position to
remove your push rod, I suggest you use a (squeezed tip) syringe to squirt some
oil around the push rod shroud o-ring. That will make the removal of the shroud
a much simpler task!
[Hind Sight] I am sure
having all the push rods within Lycoming specifications is a good thing.
Unfortunately, it did not change my slightly higher than normal manifold
pressure issue.