Painting
Time has arrived for some new colors to my Cozy. I spent
many many hours searching for the "perfect" paint scheme - should it be simple or artistic,
straight lines, curve lines, strong colors, light colors, no colors...., asking
for other's opinion was no help, all I got was more opinions and uncertainties
![]() . I
learned that most of us ended up making their final decision till the last
minute, or the painter ended up making the decision for us! I was no exception.
. I
learned that most of us ended up making their final decision till the last
minute, or the painter ended up making the decision for us! I was no exception.
The next decision was to find a 'good' paint shop that will give you a reasonable price. Since I have completed my Phase 1 and flown my Cozy to far off airports, I was not restricted to local paint shops. Regardless, the most convenient option is still having you plane painted at the local shop because, most likely, you have to disassemble a few key components of the plane (e.g. elevators, ailerons, canopy, cowlings, rudders, landing brake, etc.) for ease and complete paint coverage. In addition, the thought of fit issues (after paint) at a remote site is a cause of minor concern (for me anyway).
Decision to go with Local Paint Shop
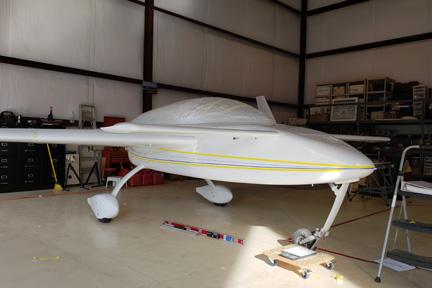
We have a local paint shop here in Chino Airport for years, I have seen their work and they looked decent. I asked around locally and received both positive and negative experiences. As my time arrived, I went ahead and contacted them. To my surprise, the original paint shop was just sold to a new owner ( ~ a month ago in late 2018), with new paint staff and manager. I took note and observed the Cirrus they just painted - it was gorgeous! Hmmmm....maybe I am in luck. I told them I'll do whatever I can in prep work to minimize my paint cost - they were OK with that.
Further discussion with their new Manager, actually, taught me a lot more about airplane painting process. I soon learned that this shop does a lot more than sanding entire plane down with 320 grit, then shoot it with primer and paint - that's it. Here's my experience with this local shop:
|
Inspection: Before they provide me a quote, the owner and one of her head painting staff came to my hangar and did a thorough inspection on my Cozy. They tagged all the needed "areas of improvements" with a yellow masking tape. Actually I was pleased with that because having a professional's set of eyes to look over my work will just improve the paint result. They also wanted me to mask the canopy and windows. The paint staffer showed me the exact "technique" how he wanted the canopy and windows to be masked as well as the masking tapes to be used. I told them that the plane has been primed 2 years ago and that they need to address the priming issue before applying paint. I also provided them my conceptual graphics on my preferred paint scheme. |
|
Disassemble Components: We established the components to be disassembled prior to painting such that the painter can have a clear and clean shot at "hard to get places". Disassembly included canopy, cowlings, land brake, elevators, ailerons, rudders, strobe lights, IP cover, nose cover, wheel pants, main gear belly cover, and main wing bolt covers. |
|
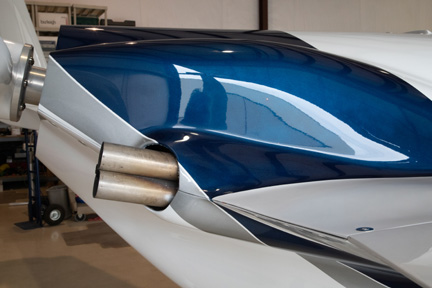
Quotation: After I showed the manager the cleaned up "areas of Improvements" (as discussed above), the quotation arrived. It specified the paint to be used (Sherwin Williams Jet Glo) snow white base, Dark Blue and Silver for the stripes. I have to admit, the quotation was reasonable compared to others. I signed off to the quotation and gave them my 50% deposit. We were on! |
|
Delivery of Plane and Parts: Time has come for the paint job to commence. The shop came over with their long truck and hauled off all the disassembled parts. Doug and I pushed the "bare" plane over to the paint shop - probably 2,000 feet from our hangar. My two concerns were inventory of all the disassembled parts and the "bare" plane sitting out in the open. The manager took pictures with his phone on all the delivered parts as record and promised to keep my plane inside their shop at night. |
|
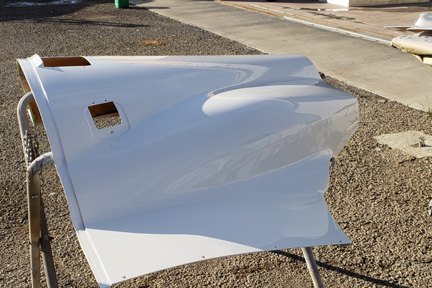
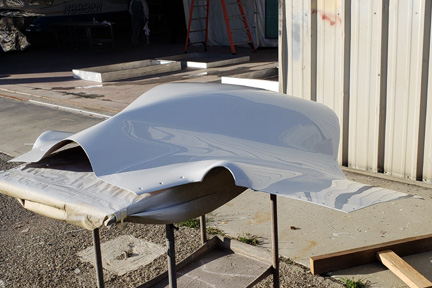
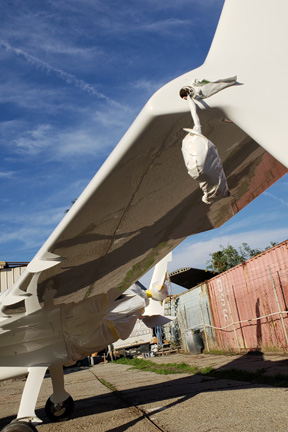
Base Coat: After a few days, I received a text from the owner that I should go take a look as the base coat as it was painted the day before. I arrived at the paint shop as all the painted parts were basking in the sun. I do not know if it is the Jet Glo, their workmanship or both - they looked gorgeous! All the painted surfaces had a mirror-like reflective surface. I was pleased. I even took a few pics of the bottom surfaces (Pic #4) just to see if they are as reflective. As you can see, they were. Supposedly, they roughed up my original primer coat, applied a new primer coat, then applied base coat (white) two hours later. |
Upon close inspection, I noticed a few blemishes and I
pointed it out to the manager. Without hesitation, he handed me a yellow tape to
mark them - no "tough !@#$" type of attitude. He stressed that their approach is
that - if you are not happy with their work, point it out, they will correct it.
They want the customers to be happy when the work is done. This is especially
important (to them) as they just took over the original paint shop. I was pleased. So
Doug, Patti and I went over the base paint with a fine tooth comb - no mercy
(Pic #5)![]() !
Turned out all these blemishes will be removed by their subsequent (standard)
paint buffing process anyway.
!
Turned out all these blemishes will be removed by their subsequent (standard)
paint buffing process anyway.
 |
 |
 |
 |
 |
|
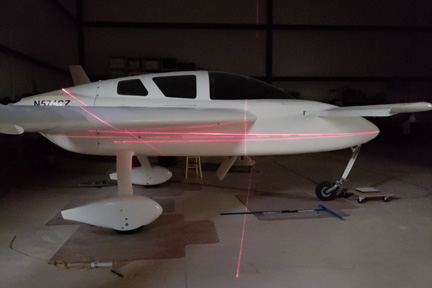
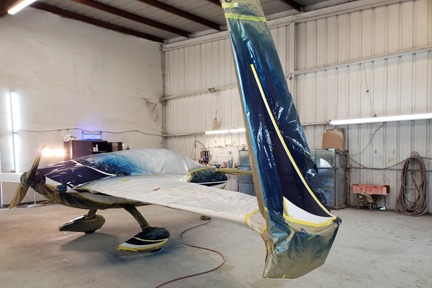
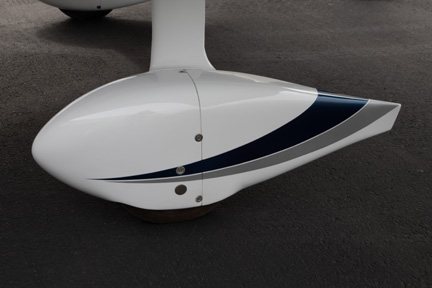
Striping Layout: As discussed above, it was hard to decide on the paint scheme all the way up till the last minute. With my suggested paint scheme, I offered to use my laser to cast a level line on the plane for their staff before laying out the graphical scheme. They took the opportunity and came over to my hangar to start the layout (Pic #1). Once they got the baselines established (Pic #2), they rolled the plane back to their shop to complete the stripping layout. It was a time consuming process, took them days before they were satisfied with the curvatures (among the fuselage, rudder & wheel pants), line widths etc. The manager, owner and staff actually suggested a few changes to my original paint scheme. They included adding a thin spacing between the blue and silver strips and offsetting the silver strip to start slightly behind the blue stripe. Blue stripe painted (Pic #3), ready for masking the silver stripe. Another view of blue stripe (Pic #4). Painting complete with masking paper off, except the canopy (Pic #5). It turned out very nicely! |
 |
 |
 |
 |
 |
|
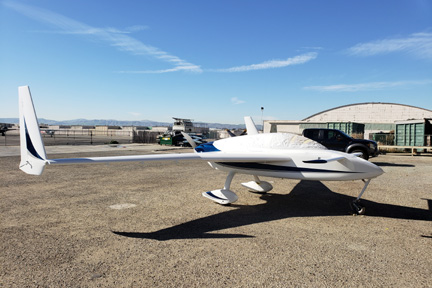
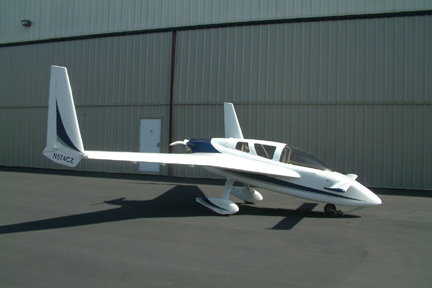
Buffing Process: After the masking was removed and the plane rolled out of the paint shop, I was under the impression that the paint job is pretty much done. All they have to do is to clean up the blemishes Doug, Patti and I identified earlier - well not quite... I went into the shop the next day and I was very surprised to see all the shiny surfaces were roughed up again. Turned out a final buffing process is their standard procedure. Prep work for the buffing process is to rough up the surface with 1,500 grit (by hand). Broke my heart to see such a nice shiny surface look dull again! Three days later, the buffing process was completed. The paint job looked awesome! |
Here's a few pictures on the final finish!
 |
 |
 |
Paint Weight
One of the questions most builders wanted to know is how
much weight will be added to the plane? So I weighed the plane prior and plan
to weigh it again after it returns. To make this effort more fun, I offered
the paint shop staff to make a guess as to the weight to be added by the paint.
The person who guessed it closest will be offered a nice dinner for 4 on me! I
guessed 30 lbs, Doug guessed 50, Bill guessed 16 lbs, the shop staff's estimates range from 2 lbs to 10 lbs. I
have a feeling both Doug and I are way off![]() !
!
After the plane returned from the paint shop, I re-assembled all the parts (i.e. canard, elevators, ailerons, landing brake, main gear cover, canopy, cowlings, IP covers etc.). Doug helped me to roll the plane back onto the same weigh scales. The anticipation was high! It turned out the Paint + Primer added only 5 lbs to the plane! One interesting effect I learned is that it actually moved my CG back by 0.15". My guess is that most of the paint went to the back of the plane, such as the wings, rudders & cowlings. Relatively less paint goes to the front of the plane such as the nose & canard. The Paint Shop manager who guessed 2 lb won the free dinner from me.
With final paint, instruments, ELT, oxygen, auto-pilot etc., empty weight of my plane come to 1,201 lbs.