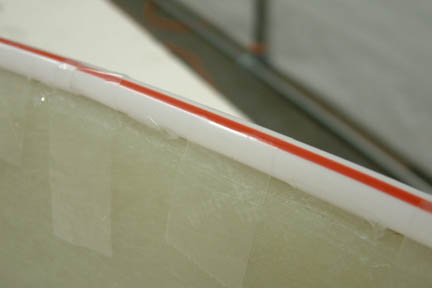
 The O.D. of the
brake lines supplied by Matco is 1/4" in diameter. I took me a bit of
treasure hunting to find soda straws with I.D. larger than 1/4". Wendy's and
Taco Bell's are too small - I eventually found them at In-And-Out Burgers. In
addition, the soda straws have two opposing red stripes on it such that I can
line up the bottom strip along the ridge of the strut and build up the trailing
edge support along the top strip.
The O.D. of the
brake lines supplied by Matco is 1/4" in diameter. I took me a bit of
treasure hunting to find soda straws with I.D. larger than 1/4". Wendy's and
Taco Bell's are too small - I eventually found them at In-And-Out Burgers. In
addition, the soda straws have two opposing red stripes on it such that I can
line up the bottom strip along the ridge of the strut and build up the trailing
edge support along the top strip.
I did not
follow the plans exactly when securing the straws onto the strut. I used scotch
tape and hot glue gun instead of the 5 min epoxy. First, I drew a line along the
crest of the trailing edge (of the strut) and lined up the red stripe (of the
straw) along the line. Then I used scotch tape to secure the soda straws in
place. This way, I can move them around and re-tape until the straws take the
bend along the lines as intended. Now my hands are free to do the final securing
with the hot glue gun. This way, I do not have to rush to get the straws in
place before the 5 min epoxy cures. Once the hot glue is cured (normally within
seconds), I remove the scotch tape and am ready for the micro.
Don't forget to
seal the seams of the straws with scotch tape, I did... Unfortunately, I found out
after I built up the 2-ply trailing edge support. I had to push hard with
my brake line to break off the micro that seeped inside the straws through
the joints. Got me sweating a little... .
.
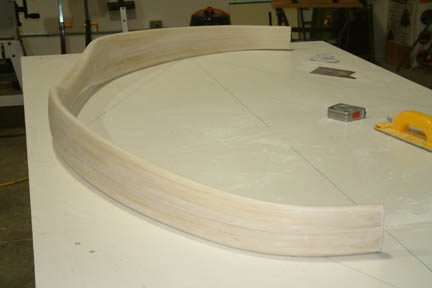 I bought my
strut from Feather Lite and it was delivered within 30 days. The quality looked
so good compared to my work, I didn't want to touch it with any sandpaper.
However, the plan says - dull the surfaces with 36 grit sandpaper... oh well
I bought my
strut from Feather Lite and it was delivered within 30 days. The quality looked
so good compared to my work, I didn't want to touch it with any sandpaper.
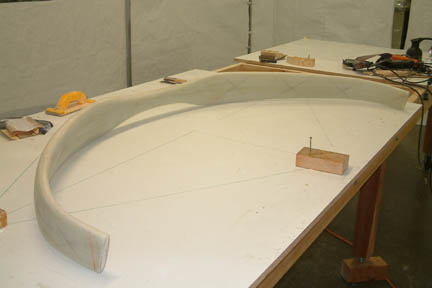
However, the plan says - dull the surfaces with 36 grit sandpaper... oh well 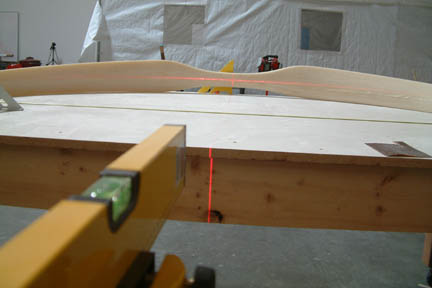 I followed the
plan method except I was not sure how to get the 'mid-chord' location along the
inside surface of the strut. If I draw a line joining the mid-point at the
center of the arch to the mid point at the end of the strut,
it will look awkward. I decided to pull out my laser and put a horizontal line
along the inside arc to guide my filament tape. I hope I am right. If you
look real close, you can see the edge of my tape sits right along the laser
line. My filament tape turned out to be 96" which means I need to remove
1" excess or .5" from each leg.
I followed the
plan method except I was not sure how to get the 'mid-chord' location along the
inside surface of the strut. If I draw a line joining the mid-point at the
center of the arch to the mid point at the end of the strut,
it will look awkward. I decided to pull out my laser and put a horizontal line
along the inside arc to guide my filament tape. I hope I am right. If you
look real close, you can see the edge of my tape sits right along the laser
line. My filament tape turned out to be 96" which means I need to remove
1" excess or .5" from each leg. 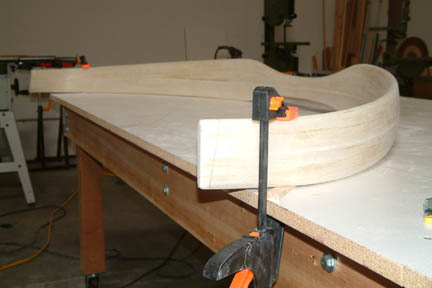 I
cut out a couple pieces of wood block with a 8o angle as a guide for
trimming the end of the strut. At first I clamped the blocks onto the strut to
guide my saw with little success. The blocks tend to shift around and the saw
blade kept snagging the blocks and so on... I finally took the blocks off and
used my FEIN tool instead. First, I made a deep scribe line along the pencil
marks on both sides of the strut. These scribe lines guided my final cut with
the hack saw. I used a new blade with 18 teeth. Since the strut has been
pre-cut, I only needed one hack saw blade for both ends.
I
cut out a couple pieces of wood block with a 8o angle as a guide for
trimming the end of the strut. At first I clamped the blocks onto the strut to
guide my saw with little success. The blocks tend to shift around and the saw
blade kept snagging the blocks and so on... I finally took the blocks off and
used my FEIN tool instead. First, I made a deep scribe line along the pencil
marks on both sides of the strut. These scribe lines guided my final cut with
the hack saw. I used a new blade with 18 teeth. Since the strut has been
pre-cut, I only needed one hack saw blade for both ends. 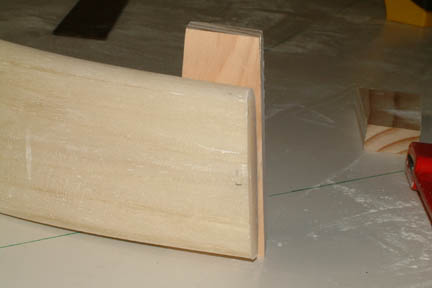 Once
completed, I sanded down the tips with a hand sander, checked them against
the wood blocks and made sure the 8o angles were achieved. Looks
pretty good!
Once
completed, I sanded down the tips with a hand sander, checked them against
the wood blocks and made sure the 8o angles were achieved. Looks
pretty good! 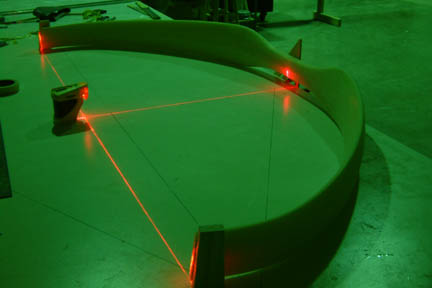 As
a final check, I used a cross laser to make sure that both legs are close in
length from center. The picture looked green because the laser did not show up
well under normal light, so I have to turn the light off before taking the
picture. I think I got it pretty close as well...
As
a final check, I used a cross laser to make sure that both legs are close in
length from center. The picture looked green because the laser did not show up
well under normal light, so I have to turn the light off before taking the
picture. I think I got it pretty close as well... 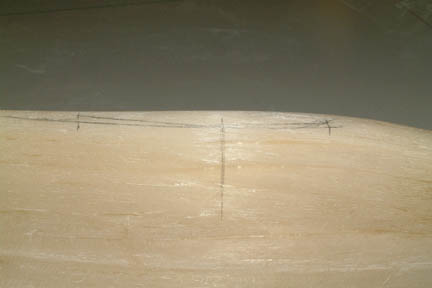 The
next step is to find the spot that is 5.75" wide and trim it down by
1/8". With the strut laying on the table as is, I slid a square along its
side. I found the high spot easy enough, and drew a level line 1/8" below the
highest point. The vertical line shows the highest spot and everything above the
horizontal line is to be removed.
The
next step is to find the spot that is 5.75" wide and trim it down by
1/8". With the strut laying on the table as is, I slid a square along its
side. I found the high spot easy enough, and drew a level line 1/8" below the
highest point. The vertical line shows the highest spot and everything above the
horizontal line is to be removed. 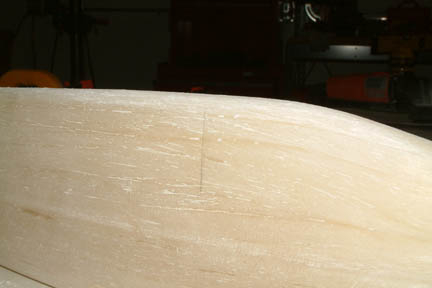 I
used 36 grit paper and removed the bulge. Since the next step requires a 4 ply UND
over this trailing edge, I made sure I rounded off the edges as well. This
is the 'after' shot showing the contour after sanding.
I
used 36 grit paper and removed the bulge. Since the next step requires a 4 ply UND
over this trailing edge, I made sure I rounded off the edges as well. This
is the 'after' shot showing the contour after sanding.  I
did not use a protractor to measure out the 30o for cutting the UND because a little bit off from my small protractor could mean a lot at the other
end. I just used a bit of trigonometry and calculated the lengths of the UND required. Since the width of the
UND roll is 38", if you mark the base to
65.82" and every 24" apart, you'll get a 30o - 12"
strip EVERY time. Just make sure the UND is laying straight against the edge of
the cutting table. In addition, I used the masking tape method to keep the
strips in tact before cutting. I cut 9 strips instead of 13 as called out in the
plans. I figure each strip has a 'usable' length of 55" and half of the
strut is 47.5", I only need 8 strips with 1 for spare. I ended up screwing up
1 strip and used the remaining 8 to finish the task - good planning, I'll say
I
did not use a protractor to measure out the 30o for cutting the UND because a little bit off from my small protractor could mean a lot at the other
end. I just used a bit of trigonometry and calculated the lengths of the UND required. Since the width of the
UND roll is 38", if you mark the base to
65.82" and every 24" apart, you'll get a 30o - 12"
strip EVERY time. Just make sure the UND is laying straight against the edge of
the cutting table. In addition, I used the masking tape method to keep the
strips in tact before cutting. I cut 9 strips instead of 13 as called out in the
plans. I figure each strip has a 'usable' length of 55" and half of the
strut is 47.5", I only need 8 strips with 1 for spare. I ended up screwing up
1 strip and used the remaining 8 to finish the task - good planning, I'll say 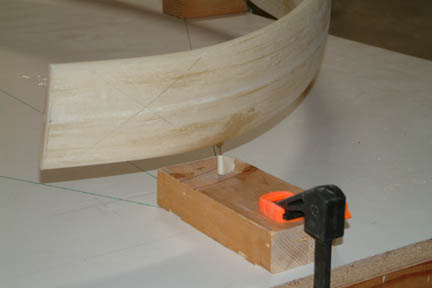 I
supported the strut with three 2" screws on top of wood blocks for
glassing. I knew I was in trouble once I laid down the first layer - there was
just not enough room for me to see or get to the underside for any serious glass
work. But it was too late to move the strut around and I knew I was going to
have some sanding work to do afterwards.
I
supported the strut with three 2" screws on top of wood blocks for
glassing. I knew I was in trouble once I laid down the first layer - there was
just not enough room for me to see or get to the underside for any serious glass
work. But it was too late to move the strut around and I knew I was going to
have some sanding work to do afterwards. 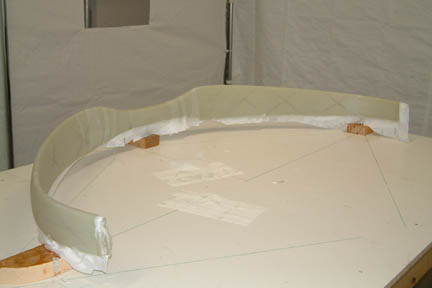 The
first layer was the toughest because I was trying to get the UND to
wrap perfectly at the underside - with no success. Eventually, I
decided to trim the UND off at the bottom edge and just do the best I could.
The
first layer was the toughest because I was trying to get the UND to
wrap perfectly at the underside - with no success. Eventually, I
decided to trim the UND off at the bottom edge and just do the best I could.
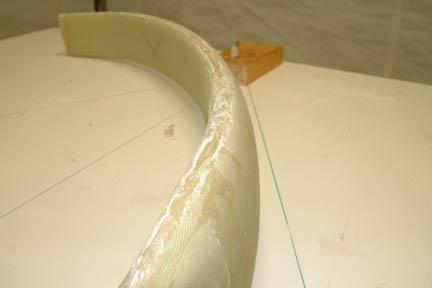 As expected,
the glass at the top side of the strut turned out well, but the bottom edge did
not. I have uneven glass coverage and glass spikes all along the bottom
edge. Not good - I thought... Fortunately, there will be 4 more layers of UND
to be wrapped around this forward edge. All I need to do is to smooth out
the UND and blend them back to the basic strut.
As expected,
the glass at the top side of the strut turned out well, but the bottom edge did
not. I have uneven glass coverage and glass spikes all along the bottom
edge. Not good - I thought... Fortunately, there will be 4 more layers of UND
to be wrapped around this forward edge. All I need to do is to smooth out
the UND and blend them back to the basic strut. 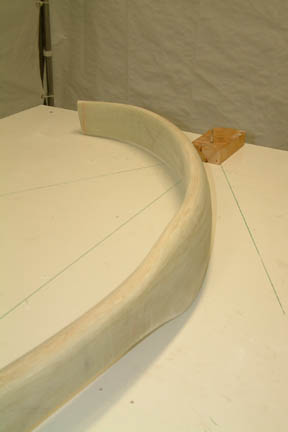
 With
a lot of patience and sanding, I was able to clean up the forward edges. I used
a full range of 36 grit to 150 grit sanding papers for the task. Actually, via
this task, I learned to use the 36 grit paper better and be comfortable
with it. See... something good can come out of a not so good situation
With
a lot of patience and sanding, I was able to clean up the forward edges. I used
a full range of 36 grit to 150 grit sanding papers for the task. Actually, via
this task, I learned to use the 36 grit paper better and be comfortable
with it. See... something good can come out of a not so good situation 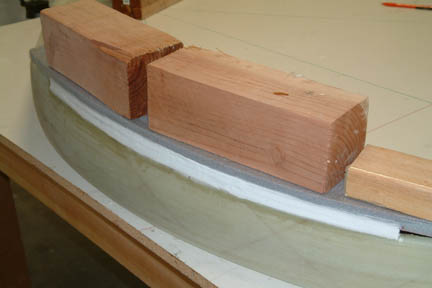 Instead
of using the aluminum tape, I followed Rick Maddy's foam wall approach.
I took a 3/4" piece of foam and laid it on top of the straws. I traced
out the profile of the strut (instead of the straw) on the foam. I
trimmed along the line with the band saw and sanded smooth. Then, I
wrapped the foam edge with packing tape and weighted it down prior to
glassing.
Instead
of using the aluminum tape, I followed Rick Maddy's foam wall approach.
I took a 3/4" piece of foam and laid it on top of the straws. I traced
out the profile of the strut (instead of the straw) on the foam. I
trimmed along the line with the band saw and sanded smooth. Then, I
wrapped the foam edge with packing tape and weighted it down prior to
glassing.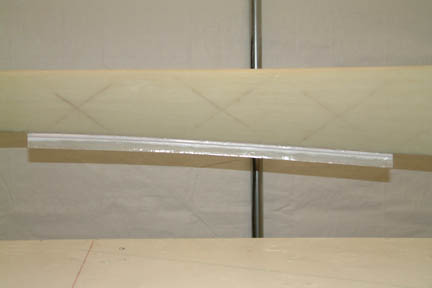 Here's
a picture of the completed trailing edge strut support viewed from the back
side and ready for the next micro and 4-ply UND.
Here's
a picture of the completed trailing edge strut support viewed from the back
side and ready for the next micro and 4-ply UND. 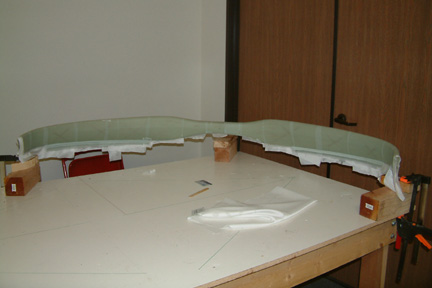 I
repeated the above UND cutting process for the 2nd set of 4 ply (above) except,
I cut it a bit wider (13.5") to accommodate the trailing edge support. I
cut a total of 8 strips of UND because that's what I used the last time. I did a
couple things differently though:
I
repeated the above UND cutting process for the 2nd set of 4 ply (above) except,
I cut it a bit wider (13.5") to accommodate the trailing edge support. I
cut a total of 8 strips of UND because that's what I used the last time. I did a
couple things differently though: 2)
I wet out the UND on a thin packing plastic sheet before laying them down onto
the strut. This approach was faster because I can wet out the UND much quicker
when it is flat on the bench and I can move the glass around much easier for
lining up its fibers to the 35o of the strut.
2)
I wet out the UND on a thin packing plastic sheet before laying them down onto
the strut. This approach was faster because I can wet out the UND much quicker
when it is flat on the bench and I can move the glass around much easier for
lining up its fibers to the 35o of the strut.